

Tijdens het uitproberen hoe ik de springveren van opa’s
rookstoel kon maken met (zeer glanzend) metaaldraad, herinnerde ik mij ineens
van uit mijn kindertijd dat die springveren eigenlijk meer ‘zwartig’ van kleur
waren. Onderzoek op internet gaf mij de indruk dat er gegloeid ijzerdraad werd
gebruikt voor het vervaardigen van deze springveren.
Vanuit mijn kindertijd weet ik hoe die springveren van de zitkamer
stoelen eruit zagen. Want als mijn
moeder de kamer een grote beurt ging geven, werden alle stoelen op een rijtje
in de gang gezet. Een mooie gelegenheid voor ons, kleintjes uit het gezin, om
“treintje te spelen”. Deze springveren zittingen lagen in de stoelzitting en
werden verwijderd om buiten de deur uitgeklopt te kunnen worden. Wij zaten dan
op de grond even te wachten totdat de stoelzittingen klaar waren en weer op hun
plaats lagen in de stoelen. Als je dan zo op de grond zat, kon je die veren van
onder aan de zitting zien zitten.
Dus om al met al een realistischer effect te verkrijgen, besloot
ik dus voor gegloeid ijzerdraad te gaan om dichterbij die ‘zwartige kleur’ te
blijven.
While trying out how to make the springs of grandfather's
smoking chair with (very shiny) metal wire, I suddenly remembered from my
childhood that those springs were actually more "blackish" in color.
Research on the internet gave me the impression that annealed iron wire was
used to make these spiral metallic springs.
From my childhood I know what those spiral springs of the
sitting room chairs looked like. Because when my mother was going to give the
sitting room a big overhaul, all the chairs were placed in a row in the
hallway. A great opportunity for us, little ones, to “play train”. These spiral
springs were in the seat of the chairs and were removed to be beaten free of
dust outdoors. We would then sit on the floor waiting for the loose seats to be
ready and back into place on the chairs. If you sat on the floor like that, you
could see those blackish springs from the bottom under the seat.
So all in all, to get a more realistic effect, I decided to
go for the so called annealed wire, to stay closer to that "blackish
color".

Nu ga ik laten zien hoe ik de springveren in deze stoelzitting
heb gemaakt, dat doe ik aan de hand van foto’s. Het was inderdaad een ingewikkelde
maar leuke uitvinding, want zeg nou eerlijk: wie doet er nu zoveel werk om
springveren te maken, als je ze daarna toch nooit meer ziet…??
Tja, ik vond het
gewoon leuk om uit te proberen.
Now I am going to show how I made the spiral metallic
springs in the chair seat, I'll do that by using photos. It was indeed just a complecated,
nut nice invention, because let's be honest: who does so much work to make
spiral springs, if you will never see them again afterwards... ??
Well, I just
loved trying it out.


Je neemt een tangetje met een taps toelopende bek en dus
ijzerdraad. Je knipt een stukje ijzerdraad van ongeveer 8 cm af en zet in het
midden hiervan de uiterste punt van het buigtangetje, doe je dat te ver dan kan
de gebogen draad niet uit het tangetje vallen en zit alles vast. Dan draai je
één helft van het draad (NIET te strak) om de taps toelopende bek van de tang,
je vormt dus een spiraal van het ijzerdraad. Nu komt het moeilijkste gedeelte: draai
de bek van de tang naar de tafel, de bek moet nog ietsje open kunnen zodat het
gebogen gedeelte van ijzerdraad eruit valt. Als het draad los uit de tang
gevallen is, draai je de spiraal om en pak je het midden van de 8 cm ijzerdraad
weer op met de punt van de tang, nu buig je de andere helft als een spiraal om
de taps toelopende tang, waarna je de tang weer ietsje opendoet om de spiraal
te laten vallen op je werkblad. Als dit je gelukt is heb je zelf spiraalveren
gemaakt. Ik heb er maar negen gemaakt, toen vond ik het wel genoeg geweest 😉!
You take pliers with a tapered shape and the 'blackish' iron
wire. You cut a piece of iron wire of about 8 cm and place the very tip of the
pliers in the middle of this, if you do that too far, the bent wire cannot fall
out of the pliers and everything is stuck. Then you wrap one half of the wire
(NOT too tight) around the tapered shape of the pliers, so you form a spiral of
the wire. Now comes the hardest part: turn the pliers with the tip towards the
table, the beak of the pliers must be able to open slightly so that the bent
part of iron wire falls out. When the wire has fallen loose from the pliers,
turn the spiral and pick up the center of the 8 cm wire again with the tip of
the pliers, now bend the other half like a spiral around the tapered pliers,
after which you open the pliers slightly to let the spiral fall on your work
surface. If you succeeded, you have made self spiral springs. I only made nine,
then I had enough of it 😉!

Deze springveren stoelzittingen kunnen (o.a. in 1:1 manier)
gemaakt worden, als volgt: eerst zet men de banden vast met kleine
kopspijkertjes aan de onderkant van de houten zitting, daarna komt het van
tevoren geproduceerde springveren gedeelte in de zitting, waarna de springveren
onderling aan elkaar worden vastgezet met koord en aan de houten zitting van de
stoel. Hierna wordt de zitting bekleed met stof dat met spijkertjes wordt
vastgezet.
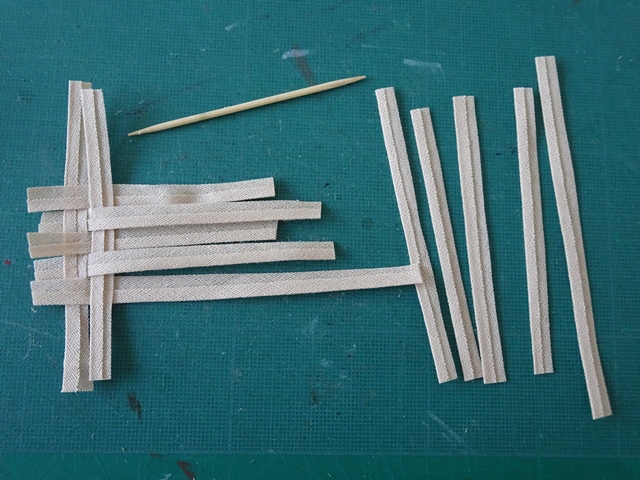
Ik ben begonnen met het maken van die banden, in mini gemaakt
van door midden geknipt biasband van 10 mm breed. Na het knippen heb ik ze
gevlochten, daarna zijn de buitenste rijen aan elkaar gelijmd met Tacky Glue
Clear, zodat ze een ‘stevig’ oppervlak werden. Daarna heb ik ze bij geknipt
totdat ze ongeveer 1 centimeter breder waren dan de eigenlijk houten zitting
van de rookstoel.
These spiral spring seats can be made (in the 1:1 way) as follows:
first the straps are fastened with small tacks at the bottom of the wooden
seat, then goes the pre-produced part with spiral springs in the seat, after
which the springs are mutually connected and secured in place with cord, and
also secured with tiny nails to the wooden seat part of the chair. After this,
the seat is covered with a filling like fiberfill or (horse) hair and than the
fabric, which is fastened with (decorative) nails.
I started making those straps, made in mini from 10 mm wide
bias ribbon, cut in half. After cutting, I braided them, then the outer rows
were glued together with just a tiny dot of Tacky Glue Clear, so that they
became a "solid" surface. Then I trimmed them until they were about 1
centimeter wider than the actual wooden seat of the chair.


Ik heb de springveren verdeeld over het oppervlak van de
banden, ietsje meer naar het midden toe, en op die plaats vastgelijmd met ’n
klein beetje sieradenlijm, zodat ze niet zouden verschuiven tijdens het
onderling bevestigen met het koord.
Voor het aan elkaar knopen heb ik gewoon beige katoenen
naaigaren gebruikt, de naald is een zeer fijne quilt naald, want een gewone
naainaald was te lang. Om bij de binnenste veren te komen, moest ik mijn pincet
gebruiken om de naald op en neer te kunnen bewegen, pfff, de ruimte ertussen
was zó klein!
Toen elke veer in het midden én aan vier zijden was
vastgeknoopt, heb ik het garen (onder lichte spanning) aan de zijkanten
vastgelijmd.
Toen het vastzetten van de springveren met koord klaar was,
heb ik de banden aan de onderkant hier en daar bewerkt met wattenstaafje,
gedept in een héél klein beetje distressinkt. Op die manier lijken ze oud en
versleten.
I spread the springs across the surface of the straps, a bit
more to the centre, and glued them in place with a little amount of jewelry
glue so that they wouldn't shift while attaching them together with the cord.
For the knotting I used plain beige cotton sewing thread,
the needle is a very fine quilting needle, just because a regular sewing needle
was too long. To get to the inner springs I had to use my tweezers to move the
needle up and down, whilst making knots, phew, the space in between was so very
small!
After each feather was knotted in the middle and on four
sides, I glued the yarn (under slight tension) to the sides.
After the fastening of the springs with cord was finished, I
edited the straps on the underside here and there with cotton swab, dabbed in
just a very small amount of distress ink. That way they look old and worn out.


Uit 1,5 mm dik passe-partout karton heb ik een soort van
zitting gesneden, met daarin een open ruimte ten behoeve van de springveren,
die daardoor naar boven kunnen uitsteken.
Ter versteviging (en vóór gebruik) heb ik het passe-partout
karton een met water verdund laagje waterbeits (licht eikenkleur) gegeven, dat
kleurt mooier bij deze oude stoel.
Nadat de veren geknoopt en vastgelijmd waren, heb ik de
zitting van karton over de veren heen op de zijkanten van de banden met weinig
lijm vastgelijmd. De veren komen zo mooi schuin aflopend in het zicht door de
opening tevoorschijn.
Laat alles tussen elke stap en aan het einde goed drogen.
N.B. De losse springveer in het midden heb ik al door de
banden heen gehaald door eerst een gaatje te prikken en dan een gedeelte van de
veer erdoor te halen, daarna werd deze betreffende springveer pas vastgelijmd
en geknoopt aan de andere springveren.
I cut a kind of chair seat from 1.5 mm thick passe-partout
cardboard, containing an open space for the springs, this way they can
therefore protrude upwards.
For reinforcement (and before use) I have given the
passe-partout cardboard a water-diluted layer of water stain (light oak color),
which colors better with this old chair.
After the springs were knotted and glued, I glued the
cardboard seat over the springs to the sides of the straps with a little glue.
Through the opening the spiral springs appear this way beautifully sloping in
view.
Let everything dry thoroughly between each step and at the
end.
N.B. I have already passed the loose coiled spring in the
middle through the bands, by first poking a hole and then pulling a part of the
spring through it, after which the relevant coiled spring was than glued and
tied to the other spiral springs.

Na het maken van de veren heb ik de rugleuning gestoffeerd,
want die was gemakkelijk om te doen. De drie lagen stevig papier waren al
voorgevormd (zie vorig blog bericht), hierop heb ik een heel dun laagje
fiberfill gelegd, waarna de stof er overheen gelijmd is met contactlijm. Ik heb
een extra deukje in de leuning gemaakt door hard te drukken in de bijna droge
lijm, zodat het net een versleten stoelleuning lijkt (zie verderop foto’s). De
zijkanten zijn bewust op ongeveer één mm open gelaten bij het dichtlijmen,
zodat de rugleuning gemakkelijker tussen de houten delen gelijmd kon worden.
Anders kun je tussen de bekleding en de houten delen een kiertje zien en dat
staat niet mooi (óók niet mooi is dat opa dan tevens door de rugleuning heen
zakt, als hij aan het eind van de dag eindelijk gaat zitten ;O)).
N.B. Deze rugleuning wordt pas NA de zitting erin gelijmd,
anders kun je niet goed bij de hoekjes tijdens het vastlijmen van de zitting!
After making the springs I first upholstered the backrest,
because it was easy to do. The three layers of sturdy paper were already
preformed (see previous blog post), I put a very thin layer of fiberfill on
top, after which the fabric was glued over it with contact glue. I made an
extra dent in the backrest by pressing hard in the almost dry glue, so that it
looks like a worn out chair back (see photos later on). The sides were
deliberately left open about one mm, while gluing, so that the backrest could
be glued between the wooden parts more easily and it would fit right. Otherwise
you can see a crack between the upholstery and the wooden parts and that does
not look good (also it's not nice if mini grandpa also sinks through the
backrest when he finally sits down at the end of a day of hard labour ;O)).
N.B. This backrest is only glued AFTER gluing in the seat,
otherwise you will not be able to reach the corners when gluing the seat!


Voordat je de stoelzitting gaat stofferen, is het handig om
aan de buitenkant de banden en de daarop vastgelijmde ring van passe-partout
karton ietsje los van elkaar te halen. Dit is even peuteren maar gaat
gemakkelijk omdat passe-partout karton uit laagjes bestaat. Hiertussen wordt de
stof voor bekleding vastgelijmd.
Before you start upholstering the chair seat, it is useful
to slightly separate the straps and the glued-on ring of passe-partout
cardboard on the outside. This is a little fiddling but is easy because
passe-partout cardboard consists of layers. Herein between the fabric is glued
in for upholstery.


Bij het stofferen van de zitting heb ik als vulling niet
gekozen voor fiberfill, maar heb ik viltwol gebruikt in een okergele kleur (wat
paardenhaar kan voorstellen). Leg een dun plukje viltwol op de veren en de
kartonnen ring en daarop de stof, die aan de hoeken schuin is afgeknipt, anders
past het niet in de houten zitting delen.
Lijm nu met contactlijm eerst de zijkanten van de bekleding
tussen de banden en de kartonnen ring, druk goed aan en laat goed drogen.
Als het droog is, kun je het beste eerst de achterkant
vastlijmen, let op de hoekjes (eventueel extra inknippen). Als die kant goed
droog is, dan pas lijm je de voorkant van de bekleding vast. Je kunt nu de
viltwol beter verdelen onder de stof, want die wordt op zijn plaats gehouden
door de zijkanten en achterkant, die al vastgelijmd zijn. Let op de hoekjes,
die moeten in een hoek geknipt zijn en goed sluiten bij de voorpoten van de
stoel.
When upholstering the seat, I did not choose fiberfill for seat
filling, but I used felt wool in an ocher yellow color (which can represent
horsehair). Place a thin tuft of felt wool on the springs and the cardboard
ring, and on top of that the fabric, which has been cut diagonally at the
corners, otherwise it will not fit into the wooden parts of the seat.
First glue the sides of the upholstery between the straps
and the cardboard ring with contact glue, press firmly and let it dry well.
When it is dry, it is best to glue the back side of the
fabric first, pay attention to the corners (possibly extra cutting in). When
that side is completely dry, then you glue the front side of the upholstery.
You can now distribute the felt wool better under the fabric, as it will be
held in place by the sides and back, which are already glued down. Pay
attention to the corners, they must have be cut at an angle and close well with
the front legs of the chair.

Na het aan elkaar lijmen van de bekleding op de banden,
kartonnen ring en de springveren kun je de zitting alvast in het geraamte van de
stoel uitproberen, op die manier kun je de zitting nog wat laten doorbuigen,
als je dat wilt, zoals ik ook gedaan heb ;). De zitting is in mijn stoel los
gebleven en niet vastgelijmd. Hierna alles goed laten drogen voordat je verder
gaat met het inlijmen van de rugleuning.
After gluing the upholstery to the straps, cardboard ring
and springs together, you can already try out the seat in the wooden skeleton
of the chair, that way you can also let the seat bend a bit, if you want, as I
did too;). The seat has remained loose in my chair and has not been glued down.
After this, let everything dry thoroughly before you continue with gluing in
the back rest.


Voordat het stoeltje werd afgewerkt (lees af gestoffeerd)
heb ik het met beits (op waterbasis) geschilderd, telkens hele dunne laagjes en
steeds na elke laag geschuurd. Nadat de laatste laag was geschilderd, heb ik er
hier en daar (op veel 'gebruikte' plekken) weer wat beits voorzichtig
afgeschuurd met zeer fijn schuurpapier. Op die manier kreeg het stoeltje zijn
oude, versleten look.
Before the seat was finished (read finished in upholstery) I
painted it with stain (water-based), each time in very thin layers and always
sanded after each layer. After the last coat was painted, I carefully sanded
away some of the stain here and there (at many 'used' places) with very fine
sandpaper. That way the seat got its old, worn out look.


Oké, dit was een enorm lange blog bericht, sorry, maar het rookstoeltje
was dan ook nog best ingewikkeld om te maken, maar het mocht niet ontbreken in
mijn mini boerderij 😊.
Het is laat in de avond als men op de boerderij eindelijk nog
eventjes van de avondrust begint te genieten, mijn mini oma gaat nog even lezen
in de stoel van mini opa. Meer over wat ze gaat lezen in een volgend blog
bericht.
Blijf gezond en veilig, denk vooral nu na de versoepelingen
aan anderen én aan jezelf!
Dank voor jullie fijne reacties, een heel fijne
Bevrijdingsdag en rest van de week toegewenst.
Okay, this was a very long blog post, sorrry, but this smoking chair
was also quite complicated to make, however it should not be missing in my mini
farm 😊.
It is late in the evening when people finally start to enjoy
a bit of the evening rest on the farm, my mini grandmother is going to read
just for a single moment, in the chair of mini grandpa. More about what she
reads in a next blog post.
Stay healthy and safe, take care of others and yourself!
Thank you for your kind comments, I wish you a lovely
day/week.
Ilona
15 opmerkingen:
C'est un tutoriel extrêmement bien expliqué, quelle patience et surtout quelle dextérité, tu as ma chère Ilona !
Je ne ferai pas ce fauteuil (que j'admire) mais j'ai suivi sa fabrication avec un grand plaisir.
La prudence reste d'actualité, prends soin de toi ! Bises. Joce
Un perfecto y entendible tutorial sobre asiento de silla con muelles Ilona, la abuela pasará su rato de descanso leyendo su libro! Muchas gracias por las detalladas explicaciones.
Cuidaros mucho.
Besos.
muy bien explicado y un trabajo muy delicado y laborioso. la verdad es que me dan ganas de intentar hacer una silla como esa, a ver si me viene la inspiracion. esperando ver pronto mas avances, a mi tambien me gusta hacer las cosas lo mas reales posibles y tambien aunque vayan ocultas, yo se lo que hay detras de ello y el trabajo y el placer de hacerlo
Every time you put up a new post I'm stunned all over again. This is amazing. If I was just looking at a picture of the chair I would never guess it was mini, it looks so real.
Hope you and your family are all well and having a lovely spring!
Wow!
Ik ben heel dankbaar voor deze tutorial Ilona. Dank je wel dat je de tijd hebt genomen om dit allemaal op te schrijven. Ik heb enorm veel zin om dit binnenkort toe te gaan passen bij een stoel die ik binnenkort ga maken.
Zoals altijd kijk ik uit naar jouw volgende post. Eens kijken waar je ons dan mee gaat verrassen, :-)
Huibrecht
I am absolutely tickled with the way you replicated the smoking chair, Ilona! I just love it when you can make something so small look and function just like the real thing! The methods you came up with are so ingenious and the finished product is a treasure! I can't wait to see it in the farm house one day!
A great tutorial and I must say I admire the realism you put in your miniatures.
Living on a farm your grandmother deserves a rest in this armachair. I'm looking forward to knowing more a book she's reading.
Geneviève
Hi Ilona, Thank you for sharing your childhood memories with us. The chair is exquisite! I admire your patience and all the realism of your creating in your grandparents' farm house project.
Increíble Llona la minuciosidad en este trabajo, recrear todos los detalles aunque no se vean. El tutorial muy bien explicado y el gran esfuerzo en hacerlo para que lo comprendamos; muchísimas gracias es un deleite .Te deseo un buen fin de semana, cuídate. Besos
Un trabajo muy meticuloso .¡Impresionante!
Dear Ilona, your Beautiful chair is slightly worn in all the right places, with only one spring poking out and no torn webbing or hanging strings!!! (I have those problems with an old chair in my house... I tried to fix it but the people who sit in the chair like to "drop in" and it bursts the strings....!) At least Grandma is sitting nicely and so was Koos when we saw him! (Maybe it is Grandpa who "drops" into the chair a little too heavily?) :):) Again, you have made such an AMAZING and INCREDIBLE little perfect piece of mini furniture just the way it was when you were little! WOW! The spring-making tutorial is very handy! (Thank you!!!) It will surely save me time when I get around to making the old worn sofa for the Conservatory... (yes, it is on the list! LOL!) And the carefully knotted string and woven webbing is perfect too. But the part that I like best is those corner braces....! Old "real" furniture has those, and so many modern pieces don't! It gives your chair so much realism! I Love this project! And I thank you for all the work making this tutorial! Someday I will be making furniture and I will know what to do! LOL! Keep up the Great Work! :):):)
Wat goed van je om op deze manier een stoel te bewerken. Erg leuk om mee te lezen en wie weet ga ik dit nog een keer in één van mijn stoelen gebruiken.
Dank je wel voor het beschrijven van deze tutorial.
Groet, Thea
htps://thea65.blogspot.nl
Another beautiful chair, this time for the grandmother.
Thanks for the tutorial.
Okay, here I am to answer your question... You asked: "who does so much work to make spiral springs, if you will never see them again afterwards... ??" Well, this question is easy to answer: You are the one who would!!! *LOL* Because you like a challenge, because you like finding new ways and because you're you! ;O)
Thanks for this once more very well explained and illustrated part 2 of your chair tutorial - I've really enjoyed to see this outstanding piece develop and come to life. And what fun to see Mini-Grandma taking a seat... I can hardly wait to see what she's going to read after a hard day full of work and caring for the little ones who are playing train. ;O)
Hugs
Birgit
When I first saw your chair I loved it - now that I have seen all the thoughtfulness and fine details that has gone into it, I love it even more.
It is just wonderful how memories like what you saw under a chair while playing train as a child can be brought to new life in mini version many years later.
Thank you so much for taking the time to share such detailed photos and explaining to clearly how you made this exquisite piece.
Hugs,
Anna
Een reactie posten