Vandaag ben ik 'gedwongen' om de nieuwe versie van Blogger te moeten gebruiken, omdat ik mijn foto's niet meer kan uploaden in de oude versie.
Maar kijk hier: het ziet er niet uit, bovendien véél te weinig mogelijkheden!!
Dus, mijn excuses als de lay out nergens op lijkt, niet mijn schuld ;O)!!
Today I've been 'forced' to use the new layout of Blogger, since I can't upload my pictures in the old version anymore.
But see here: it's NOT of my liking, it has way too less possibilities!!
So, I am sorry, if the lay out is not of your liking, it's NOT my fault ;O)!!
(foto van internet / photo of the internet)
In mijn vroege jeugdjaren, in de jaren ’60, was het heel
gewoon dat je als kind thuis klusjes moest doen, die dingen moesten nu eenmaal
gedaan worden. Je moeder was erg druk met haar grote gezin, dus moest oud en
jong meehelpen door het doen van allerlei karweitjes in en rond huis. Karweitjes als aardappelen schillen, afwassen, schoenen van
het hele gezin poetsen, de koperen voordeurbel poetsen en tal van andere dingen
werden onder de kinderen naar leeftijd verdeeld. Op een gegeven moment, als de oudsten uit huis waren, werd
het mijn taak om de 22 meter lange ligusterhaag te knippen, met de handschaar
dan wel te verstaan hè!! Dus nu ik een ligusterhaag in miniatuur ging maken, kun je
dus wel stellen dat ik, na jaren deze haag geknipt te hebben, heel goed wist hoe
zo’n haag er uit ziet ;O)!! Op bovenstaande foto zie je hoe een gezonde ligusterhaag er (tegenwoordig) uitziet….
In my early childhood, in the '60s, for children it was very
common to do chores at home, those things just had to be done. Your mother was
very busy with her large family, so the children had to help her by doing all
kinds of chores in and around the house. Chores like peeling potatoes, washing the dishes, polishing
the shoes of the whole family, polishing the brass front doorbell and letterbox
and many other chores, you name it, were divided among us children by age. At some point, when the elder children had left house, it
became my job for cutting the 22 meter long privet hedge, that’s to say: by
hand scissors!! So now that I was going to make a privet hedge in miniature,
you can say that after years of cutting this hedge in my childhood, I know very
well how such a hedge looked looks like ;O)!! At the above picture you see how a healthy privet hedge (nowadays) looks….

(foto van internet / photo of the internet)
….en dit is hoe oude ligusterhagen eruit zien en ook hoe die
van mijn grootouders er uit zagen. In mijn vorige blog bericht kon je lezen hoe ik het netwerk van takken voor zo’n oude ligusterhaag heb gemaakt, nu ga ik laten zien hoe ik het blad in miniatuur ervan heb gemaakt. En vóórdat je dat denkt: NEE, ik heb ze niet per stuk met de hand uitgeknipt ;O)!!
….and this how old privet hedges look and also how the ones
of my grandparents did look like. In my previous blog post you could read how I made the base
of branches of such an old privet hedge, now I’ll show you how I made the
leaves in miniature. And before you think I did: NO, I didn’t cut them by hand
and per piece ;O)!!


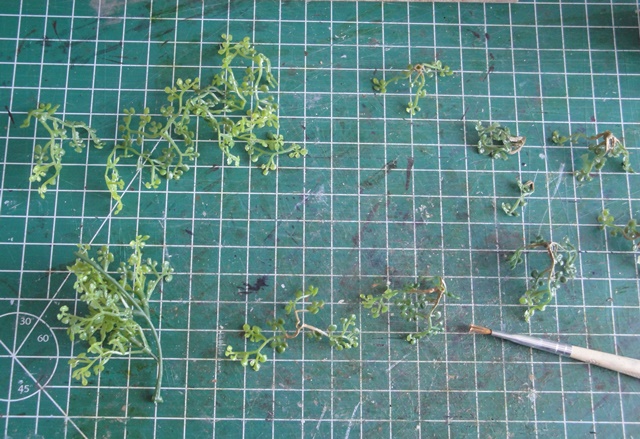
Het bleek nog niet zo eenvoudig om bruikbaar materiaal voor dit
karwei te vinden. Omdat het knippen van duizenden en duizenden blaadjes voor
vele centimeters ligusterhaag in mini, natuurlijk gekkenwerk is, besloot ik om
ander materiaal te gebruiken. Ik had voor dit doel bij Omgardens Miniaturen een
paar zakjes zeer fijn materiaal gekocht (zie bovenstaande foto's), maar het was te kort en het zag er niet uit dus kon ik
het niet gebruiken. Wat nu?
It seemed that it wasn’t that simple to find suitable
material for this job. Because cutting thousends and thousends of leaflets for
lots of centimeters long sized privet hedge in miniature, of course is pure
madness, I decided to use other material. For this purpose I purchased a few
bags of very fine material of Omgardens Miniatures (see the above pictures), but it was too short and didn’t look very
well so it was not usable for this purpose. What to do next?

Gravend in mijn opslagdozen, met gekochte spulletjes van
jaren geleden, kwam ik dit plastic fris uitziende groene plantje tegen, zou dat gebruikt kunnen worden…?
Digging in my storage boxes, with stuff I bought years ago,
I came across this plastic fresh looking green plant, can that be possibly used….?

Eerst heb ik de losse onderdelen ontward, waarbij al direct
bleek dat de plastic blaadjes en takjes erg veel kleine bochtjes hadden. Tijdens
het lijmen en plaatsen, haakte daardoor het materiaal steeds in elkaar, wat
mijnerzijds nogal wat ergernis opleverde…maar uiteindelijk is het gelukt.
First I untangled the loose parts, which immediately showed
that the plastic leaves and twigs had a lot of tiny curves. During gluing and
placing, the material constantly hooked in each other, which on my part caused
quite a bit of annoyance ... but finally it worked.

Tijdens het vastlijmen op de uiteinde van de groene plastic
blaadjes op de takjes van de MDF basis, bleek dat de groene blaadjes veel
nuances in de groene kleur had. Maar ik wist dat de beige/lichtbruine kleur van
de takken in een echte heg hier en daar door het groen heen moest schemeren. De
blaadjes waren dan wel van plastic maar ik wilde dit effect toch in mijn mini
haag krijgen. Daarom bedacht ik bij het open snijden van de rondjes in het centrum
van elk bosje met blaadjes, om dat centrum dan beige/lichtbruin te schilderen
met acrylverf en op die manier meer diepte in de heg te creëren.
During the process of gluing the plastic leaves to the
branches of the MDF base, it appeared that the green leaves had a few shades in
the green color. But out of experience I knew that the pale beige/brown color
of the branches in a real life hedge, should show up here and there. The tiny
leaves were made of plastic but I wanted this 'visible branche' effect also in
my miniature hedge. While cutting open the round shapes of leaves in the
centre, I therefore thought to paint that same centre with beige/light brown
colored acrylic paint and on that way creating more depth in the hedge.

Ik zei al dat die kronkelende plastic takjes steeds in
elkaar grepen bij het minste geringste aan beweging, hierboven kun je zien wat
een tijdrovend werkje was om al die takjes uit elkaar te houden met de vingers
van een hand om dan vervolgens met de andere hand je penseel met verf te
gebruiken……..aaarrrgghh, maar ’t is gelukt na uren geduldig werken.
I already told you that those curvy tiny branches were
constantly tangled in each other by the minimum of movement. Here above you can
see what a timeconsuming job it was for untangle all of these tiny branches
with the fingers of one hand, and than at the same time using your other hand
for painting the centre of it………aaaarrrgghh, but I succeeded after many hours
of working patiently.
Één kant van de heg klaar, nu de andere kant…
One side of the hedge is done, now the other side…
De plastic blaadjes heb ik gelijmd met UHU lijm speciaal
voor kunststoffen, niet ideaal, want als de blaadjes door draaien van het
werkstuk in elkaar haakten, dan kwamen er vaak weer blaadjes los. Na lang
drogen bleef het redelijk zitten, maar om dit soort dingen op te bergen zodat
het niet los laat….pffff.
The plastic leaves are glued on the branches by using UHU
glue especially for plastics, not ideal, because the leaves immediately tangled
in each other by turning the work piece, and if you wanted them to untangle
than the glued leaves often came loose again of the branches. After a long time
of drying the leaves were reasonably stuck, but for storing these sort of
things so that things won’t get unlose again…..phew.
Omdat de heg bij mijn grootouders op droge zandgrond stond,
wilde ik ook een lichte zandkleur onder de heg. Hiervoor heb ik de acrylverf
gebruikt (zie mijn vorige blog bericht), maar hier en daar moest (om een
bepaalde reden) de grond onder de heg ook nat zijn, dus werd er een tweede
donkerder ‘zand’-laag opgebracht van hetzelfde soort medium.
Because the hedge of my grandparents stood on dry sandy
soil, I also wanted a light sandy color under the hedge. Herefor I used the
same acrylic paint medium (see my previous blog post), but for some reason here
and there the soil had to look wet too, so I used for the darker layer of
‘sand’ the same medium in a darker shade.
Ik heb voor deze foto een paar vellen met bakstenen in 1:12 gebruikt en mijn keukendeur er tegen aan gezet, want er is nog niets klaar van deze kant van de boerderij ;).
For taking this photo I used a few sheets of brickwork in 1:12 and put my kitchen door against it, because nothing is ready from this side of the farm yet ;).
Nou, mijn ligusterheggetjes in miniatuur staan er lekker frisgroen
bij, iets wat niet gezegd kan worden van alle groene (meer triest geelgroene) gebieden in mijn streek, hier in het
oosten van Nederland. Er is hier een ernstig tekort aan grondwater en voor
komend weekend staat er weer erg warm weer met hoge temperaturen op het menu…..en in combinatie met mijn ernstige hooikoorts belooft dat niets goeds :(.
Dank voor jullie fijne reacties, allemaal een goed weekeinde
toegewenst!
Well, my privet hedges in miniature look nicely fresh green, something that can not be said of all the green (sadly more yellowish green) areas in my region here, in the east of the Netherlands. There is a serious shortage of groundwater here and
for next weekend is again warm weather with high temperatures on the menu…..and in combination with my severe hayfever it doesn't promise much good :(.
Thank you for your kind comments, have a good weekend!
Ilona


18 opmerkingen:
thank you for sharing that, Im going to need a hedge for my house that Im building and this tutorial will work just fine :)
Hugs'
Marisa
Un trabajo muy minucioso. Como siempre has conseguido un gran realismo.
Ilona,este seto ha sido un trabajo largo y muy minucioso,pero el resultado es fantástico,muy realista,por lo que la cantidad de horas invertidas,bien han merecido la pena!! Una suerte que encontraras esa planta entre tus cajas de almacenamiento,ha funcionado muy bien!
El cambio climático está cambiando paisajes en todo el mundo,aquí antes llovía muchísimo y ahora las temperaturas han subido y las lluvias son escasas,de todas formas,esta semana hemos tenido suerte y llevamos unos días de lluvias que parece seguirán durante el fin de semana,es un placer!!
Espero que tu fiebre del heno no te moleste demasiado.
Besos.
Heel mooi die Ligusturheg en het moeten knippen van een 22 meter lange heg lijkt me een ramp.
Ik leef mee met de hooikoorts, heb het zelf gelukkig niet, maar een echtgenoot die er weer flink last van heeft. Sterkte.
Gr. Thea
has conseguido un seto espectacular!
Geweldig zo'n ligusterhaag als je niet beter zo weten zou je denken dat hij echt is!
fijne dag,
groetjes van Marijke
I love your hedge! I sympathize with the chores. There were five of us and everyone had something they did. And that was in addition to the daily 'make your bed, keep your room clean, put clothes in the laundry' type chores.
It was just something you did!
My mother didn't trust us with hedge shears, though when I got older I had to mow the lawn. Thankfully I wasn't allergic then.
I hope your allergy season isn't too bad.
I hate the new blogger too. :-p
Dear Ilona, I do hope you get some rain and cooler weather so that you can manage your hay fewer.
I had to catch up on your post from last week - so much work to make your pieces of hedge but it was so worth it. It looks fabulous and what a great idea to make a couple off loose lengths of hedge so you can use them in different settings.
.
The new blogger :-(
Some of the changes are really no good, I agree. I am seriously thinking of moving.
Have a lovely weekend,
Anna
Ilona you have knocked it out of the park again with your totally real and authentic looking hedge and have come up with an amazing method to achieve it! Some tasks are so fiddly and uncooperative that even when you are left with a beautiful result you are bald from pulling your hair out! The scene you created makes me look forward to the day when you will show us the completed farm project because every single element going into it is phenomenal!
I'm a gardener who still prefers to cut my 4 boxwood hedges by hand so I can 100% empathise with the magnitude of your childhood task and know how labour intensive and time consuming, groom a hedge actually is!
But here again is the same assignment which you've volunteered for, only this time in miniature and it looks FABULOUS!
Your judicious choice of materials have made your Little Privet Hedge as tidy and well groomed as your childhood one must have been, because knowing you and your dedicated attention to details( whether in BIG or in Little) is Always done to Absolute Perfection! :D
Your fresh-looking green hedge is well worth the laborious work you spent on it. A great solution for a very difficult task.
As the eldest and only sister with three brothers, I was given the interior house chores while my brothers did the polishing and gardening parts. My job was easier but I had to stay home and practice the piano keys while they had a wonderful time playing football and other games with their friends.
Today, after using the new blogger for several posts, I reverted to the old blogger for a link and then came back to the new one. So far, linking is my only war with the new blogger.
Have a lovely weekend, dear Ilona. Stay safe!
Hugs, Drora
Pendant des années j'ai taillé la haie à la main, maintenant j'utilise un taille-haie électrique !
Ilona ta haie miniature est parfaite, tu as choisi les bons matériaux.
Chaleur ici aussi surtout hier, ce jour et demain, la pluie est annoncée.
Bon week-end ! Bises.
Un seto precioso, siempre es fantástico emplear material de esas cosas que vamos guardando.Espero que tu fiebre del heno no te de muchas molestias , por aquí lo pasarías fatal pues hay muchos chopos y genera una pelusa muy molesta , menos mal que llevamos toda la semana que no para de llover, así los alérgicos respiran un poquito .Cuídate y buen fin de semana.Besos:-)
Your hedge is fantastic. I admire your tenacity and patience to get this great result.
Geneviève
Wow, your hedge looks awesome - especially at the pictures with the bricks in the background, so realistic. And believe me, I know a thing or two about privet hedges so I dare judge the quality of your hedge... We had one around our property before we happily changed to a wooden fence which was as you know in the meantime changed with even more happiness to a metal fence. Luckily I was not in charge of cutting our hedge back then but it was my duty to collect all the green stuff and this always seemed as it would never end...
I'm sorry to hear that the greenery gave you so much trouble - but the floristic stuff you'd purchased was indeed not right for this task. And although it's now plastic and it wasn't cooperative it looks good now. And also good in shape so Mini-You doesn't have to fear that she will need to grab the scissors... and if she should ever be in need of doing this tell Schepje he shall help... because I'm telling him to do so! *LOL*
I hope you've received some rain too over the weekend - we've had serious thunderstorms and yesterday heavy rain. This will help nature to recover at least a bit, our problem is not only the drought but also the strong winds that make everything dry again in a short time. *sigh* Fingers crossed for your hayfever to be nice to you!
Hugs
Birgit
Dear Ilona, your mini hedge is so real it fooled me! I could not see the "mini" leaves for the "twigs"! (That is me trying to expand on a saying we have "Can't see the forest for the trees" which means you can't see the big picture!) LOL! I love that you found some plastic pieces that would work... they really do make the old hedge look natural! I know you have not made this part of your Farm.... but every step you add is one closer to the Building! The hedge is awesome and worth the effort! I wish you would get rain for your thirsty earth.... this weather doesn't seem fair. Stay safe and keep making awesome minis! Your work always inspires me! :):)
Gret idea for the hedge that looks natural.
I didn't think the hedges would look like much Ilona, but you've done a masterful job on them! They make me nostalgic for the farm yards of my own childhood.
Een reactie posten