


Voor de wc had ik een ander model in gedachten, maar waarschijnlij herkennen jullie dit wel: ik kon het niet meer terug vinden tussen mijn
spullen ;O!
Maar oké, ik had nog een kit van Chrysnbon Miniatures, dus
werd het deze. De waterkan heeft als merkje PM, ik weet niet meer op welke
beurs en bij wie ik het gekocht heb, sorry.
I had another model in mind for the lavatory bowl, but probably you’ll recognise this: I couldn’t find it back in my stash ;O!
But okay, I still had a kit from Chrysnbon Miniatures, so it
became this. The water jug is from the brand PM, I don’t know at what show and
from who I bought it, sorry.

Vorige keer heb ik jullie verteld dat er nog geen stromend
water was op de boerderij, dus werd de kan gebruikt om de wc door te spoelen.
Dit leverde natuurlijk, in combinatie met wat er “afgeleverd werd” op het
toilet, kalkaanslag en “viezigheid” op…..iets dat ik heb nagebootst met witte
nagellak en okergele pastelkrijt. Eerst wat nagellak in de wc pot, meteen
gevolgd door een heel klein beetje geraspte pastelkrijt en dat mengsel roer je (op
gevoel) metéén door elkaar met een wattenstaafje. Gevolg: lekker vieze aanslag
;O!
In my last blog I told you that there was no running water
at the farm, so the jug was used for flushing the toilet. Of course, this
caused, in combination with "what was delivered on the loo", lime
scale and “dirt”…..something I’ve imitated with white and beige nail polish and
yellow ochre pastel chalk. First you drop a drop of both nail polishes in the
lavatory bowl, immediately followed by just a little bit of grated pastel and
you immediately have to stirr this mixture (by the feel) with a cotton swab. The
result: a nice dirty lime scale ;O!


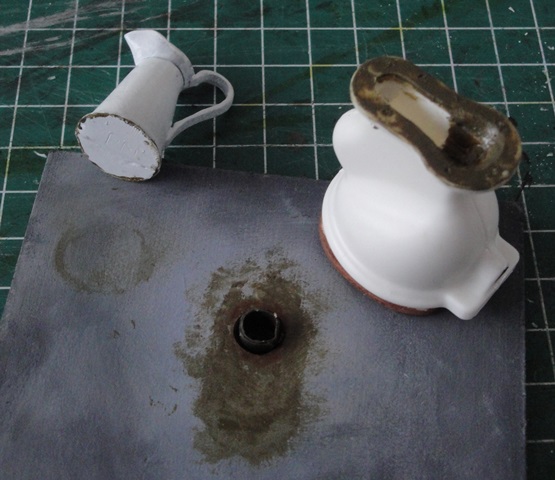
Om de wc pot op de riolering te laten passen, was het nodig
om het gat aan de onderkant aan te passen tot de juiste wijdte. Ik heb dit met
mijn Dremel gedaan, gelukkig was het geen porseleienen toiletpot ;). Daarna wat
bruinige/groenige Humbrol verf op de onderkant van de pot en klaar is Kees, eh,
de pot.
For a good fit of the lavatory bowl on the sewerage pipe, it
was neccessary to adjust the hole at the underside until it was wide enough.
I’ve done this job with my Dremel, good to know that the loo was not of porcelain
;). After that I painted a touch of brownish/greenish Humbrol paint at the
underside of the loo and the job was done. (thanks to Sheila for giving the tip
for making rust of cinnamon)

De bijbehorende wc bril heb ik weg gelaten, want er zaten
twee houten halve brilranden op het toilet van oma. Ik heb ze gemaakt van dun
triplex en met twee ingekorte koppen van naaispelden, als schroeven op de pot (met
UHU plasticlijm)gelijmd.
Het gat achterin de toiletpot, waar normaal de spoeling door
plaatsvind, heb ik dichtgemaakt met een zwarte rubber dop, zoals bij oma.
I left away the accompanying toilet seat, because there were
two half wooden edges on the toilet of grandmother. I made them from thin bass
wood and with two shortened heads of sewing pins, I glued them on the loo (with
UHU glue for plastic).
The hole at the rear side of the lavatory bowl, whereby
normally the flush water comes, is closed with a rubber stop, just as at my
grandma’s loo.

Als je goed kijkt, kun je het water onderin de wc pot zien
staan…zó, de wasknijper kan van de neus, want we gaan wat frisse lucht happen
;)!
Want op het toilet van Oma kwam wel wat frisse lucht binnen,
via een klein klapraampje. Het mini exemplaar is gemaakt van passe-partout
karton, een plastic verpakking en een naaispeld. Aan de hand van foto’s kun je
zien hoe ik het gemaakt heb.
If you look well, you can see the water at the bottom of the
bowl… thus, the peg can be taken of your nose, because we're going to get some
fresh air;)!
Because at the toilet of grandma there was yet some fresh
air coming in, by a very small swing(?) window. My mini window is made of
passe-partout cardboard, a plastic packing and a sewing pin. I’ll show you how
I’ve made it by pictures.


Voor een stevig raampje heb ik het karton aan beide kanten
van het plastic gelijmd, de lange delen en korte karton delen om en om. Het karton
is onder een hoek van graden gesneden,
zodat er geen licht doorheen kan schijnen en aan de onderkant dient de schuine
hoek om het raam te openen, hiervoor heb ik de speld gebruikt, als scharnier.
Het raamkozijn is gemaakt van 4 mm dik hout.
For a sturdy window, I glued the cardboard on both sides of
the plastic, the long and the short parts of the cardboard are alternating. The
cardboard is cut under an angle of
degrees, so that there will no light shine through and at the underside
of the window the angle is used for opening the window, for this I used the pin,
as a hinge. The window frame is made of wood 4 mm thick.


Het hout was een beetje beschadigd tijdens het zagen, daarom
heb ik de gaatjes gevuld met Alabastine, geschuurd en in de grondverf gezet ;).
During the sawing I damaged the wood a little, therefore I
filled in the gap with plaster, sanded it and gave it a layer of primer
;).

De haak om het raam tegen te houden is gemaakt van een
stukje blik, ik heb het geschilderd met crèmekleurige nagellak, gewone verf
pakt niet op blik.
The hook for preventing the window from fallen open, is made
of a scrap of can, I painted it with cream colored nail polish, common paint
won’t stick at can.

Om toch nog wat vliegen buiten de wc ruimte te houden, had
mijn Opa een hor voor de buitenkant van het wc raam gemaakt. Zo eentje met van
die klosjes, die in de winter er dan weer van afgehaald werd. Ik wilde ook een
mini horretje, maar waar moest ik dat van maken…? In mijn spullenlade vond ik
een stuk organza lint, maar er zaten vierkantjes van lijm met glitter op. Hoe
kreeg ik die er van af, want het lint was precies fijn genoeg en had de juist
kleur…
For keeping the flies outside of the lavatory, my grandpa
had made a screen at the outside of the window. One with tiny holders, so that
the screen could be removed again in winter. I also wanted to make such a
screen, but of what could I make one…? In my stash I found a piece of organza
ribbon, but there were tiny squares of glue and glitter on it. How could I get
rid of that stuff, because the ribbon was just fine enough and it had the right
color…

Eerst heb ik nagellak remover gebruikt, daar ging de glitter
er wel mee af, maar de lijm bleef stug zitten. Toen herinnerde ik me dat in
winkels een kleverig prijsje wel eens werd verwijderd met een beetje lampenolie.
Het ging…..maar ik moest er wel verschrikkelijk hard op boenen!! Ondertussen
was ik een beetje bang of al die wrijving geen brandje zou veroorzaken. Maar
nee, na lang hard wrijven: géén brand, en wél de lijm eraf :O)!!
De gaatjes, die door al dat wrijven ontstonden, mochten van
mij blijven: in oude horren zat wel eens een gaatje ;O.
At first I used nail polish remover, but only the glitter
released, the glue stayed where it was. Then I recalled that in shops they used
just a drop of lamp oil for removing most sticky price tags. It worked……but I
had to rub very, very hard on it!! While I was busy I was a bit worried about
all the friction, because it could cause fire. But no, after alot of rub: no
fire, and the glue gave up and released :O)!!
The tiny holes, which arose through all that rubbing, were
allowed to stay of me: in old screens there often were holes ;O.


Mijn Opa keek vast niet zo nauw, als hij wat latjes zocht
voor horretjes als deze, dus paste het hout (dunner gesneden lucifers) ook niet
overal in de hoekjes.
My grandpa was not so very particular, when it came to look
for some slaths for making screens as this one, so the wood (thinner cutted
matches) did not fit everywhere in the corners.


De klosjes zijn gemaakt van 2 x 4 mm hout (2 mm dik), een
speld doet dienst als schroef, zodat het kan blijven draaien. Een tipje bruine nagellak
doet dienst als roest.
En zo krijgt het toilet van Oma toch nog een fris appelgeurtje
;O)!!
Bedankt voor jullie fijne reacties, een fijne week gewenst.
The holders are made from 2 x 4 mm wood (2 mm thick), a
sewing pin is used as a screw, so that it can stay turning. A tiny dot of brown
nail polish serves as rust.
And this way the loo of grandma still gets a fresh apple odor
;O)!!
Thank you for your kind comments, have a nice week.
Ilona
19 opmerkingen:
Haha, I was waiting for this post, Ilona, and you had me gagging. I must have a very good imagination. This is an excellent piece of work with a tremendous amount of detail. Surely you're working from photos or visited the lavatory when you were grown-up already or you wouldn't remember so much. Very well done!
Que gran trabajo! Ilona has sabido plasmar perfectamente tus recuerdos (también míos)en esa taza del baño,con su suciedad acumulada,la jarra del agua...todo es muy realista!
Besos.
Ces toilettes sont plus ... Confortables, on pourra y lire son journal ;)
Ouf, de l'air frais avec cette petite fenêtre, pas de mouche et une odeur de pomme... Super !!!
Belle journée Ilona ! Bises.
So realistic!!! I always enjoy how you explain everything.
Geneviève
..peg on nose.. I have been looking forward to your loo-post and it did not disappoint LOL Who would have thought making grime, stain and goo could be so much fun and so interesting? I am really please Grandma and little-you can get some fresh air in there while still keeping those pesky flies out.
great work as always Ilona!
Anna
Geweldig Ilona, ik heb nooit het 'genoegen'gehad om op deze manier het toilet te gebruiken, maar het is voortreffelijk zoals je het hebt geschreven en aan de hand van de foto's hebt laten zien. Heel mooi gedaan.
I admire the authenticity of your Ilona achievements and the great work you have done. Thank you for sharing your manufacturing secrets!
bonne journée
bisous
Hallo Ilona,
Dit toilet is ongelooflijk goed gedaan. Je techniek om het te laten verouderen en het er realistisch uit te laten zien, werkte heel goed. Het is zo perfect en het venster met het scherm is fantastisch. Goed gedaan.
Grote knuffel
Giac
It's fantastic how you can remember all these details about the window in your grandparents' loo. Thank you for sharing how you made it.
Hugs, Drora
I'm beyond amazed. Your window will be sorely needed by your miniature residents. Can't wait to see more!
Es impresionante el realismo. Interesante como has realizado la ventana.
The window looks great, I especially love the screen with its little wooden latches.
The toilet and the window are so realistic - I can see you're having fun with this project!
What a relief that you've added this stunning window - so I was able to take the peg off from my nose. Enjoying your post peg-free was more comfortable… and so much nicer. And I also appreciate that we don't need to spray Eau de toilette everywhere - I prefer the apple odor for sure. Did I ever tell you before that you're amazing??? *LOL* Who would ever have guessed that looking down one dirty, muddy toilet could be so satisfying? *grin* Fantastic work - and the window with the fly protection screen turned out awesome too. Grandpa is right, it's necessary to keep the pesky flies and mosquitos out... even more on a farm. And next to come self cut toilet paper made of old newspapers?
Hugs
Birgit
como siempre un gran trabajo !
So realistic! I really like the window.
Lol I love this project it is amazing and so much fun. I love the window and screen. I do remember outside toilets but they did have running water phew :)
Hugs Maria
Haha, most people spend time trying to keep their toilet free of lime scale and dirt, yet you find ways to add it 😄 Those tiny details add so much realism to your builds IIona. It looks amazing
Dear Ilona, you have done it again!!! You have created something so real looking... from the barest materials... and it really makes one say "eeeeew"!!! LOL! I am so relieved there is a window with a screen... because anyone who has ever used an old "out-house" can surely remember the "aroma"! LOL! This is such an Awesome project! And I thank you for explaining all your methods and materials! It really is encouraging to see what can be built from card stock and tea-candle cups and nail polish and match sticks!!! As usual, I am in awe of your work! (And I will try to get caught up in all my comments!:):))
Een reactie posten