my e-mailaddress


zaterdag 6 juni 2020

Terug naar ‘school’ / Back to ‘school’

De kinderen van de basisschool gingen de afgelopen week weer terug naar school, iets wat mij ertoe heeft aangezet om ook weer de ‘studieboeken’ op te nemen en te zien op welke manier ik verder kon gaan met de bouw van mijn miniatuur boerderij (van mijn grootouders).

This past week the kids  here, in The Netherlands, went back again to (primary) school. It was for me the time of getting back 'to school' too and taking my ‘study books’ out and to see in what way I could make some progress with the build of my miniature farm (of my grandparents).


Een paar jaar geleden heb ik na veel zoeken twee boeken gevonden en kunnen kopen, die gaan over de bouw van een bepaald soort boerderij in de vorige eeuw (20e eeuw). Omdat de boerderij van mijn grootouders in deze streek staat en om het zo echt mogelijk na te bouwen, is dit boekje van onschatbare waarde voor mij. Ik ben het boek nu nog steeds aan het bestuderen.
Het andere boek gaat over de erfbeplanting bij dit soort boerderijen hier in deze streek, dus ook de streek waarin de boerderij van mijn grootouders nog steeds staat. Ik heb het gebruikt voor het maken van de ligusterhaag waarover dit blog bericht gaat.

A few years ago, after a long search,  I found and bought two books, who are about the build of a particular sort of farm in the last century (20th century). Because the farm of my grandparents is in this region and because I want to copy it in miniature as realistic as possible, is this booklet invaluable for me. I’m still studying this book now.
The other book is about the planting, which belongs to these types of farms here in this region, including the region where my grandparents' farm still stands. I’ve used this book for making the privet hedges what the subject of this blog post is.


Aangezien ik al jaren rondloop met het plan om de boerderij van mijn grootouders in schaal 1:12 in miniatuur na te bouwen, heb ik sindsdien ook foto’s van de echte boerderij in de jaren ’50 verzameld. Maar de enige foto van de achterkant, de keukenzijde, die op het noorden ligt, is deze die hierboven staat. Trouwens het poesje dat op deze foto staat, probeert uit een melkemmer wat melk te snoepen......de slimmerik ;O).
Ik heb me er altijd over verwonderd waarom er een stuk afgeknipt was….da’s een beetje vreemd, wat stond er op de andere helft…?
Veel is er echter niet op te zien, maar met een vergrootglas kon ik toch nog vaag een paar dingen op zien. Om meer informatie te krijgen, heb ik 25 jaar geleden al aan enkele (toen nog levende) familieleden gevraagd hoe de dingen eruit hebben gezien net na het midden van de jaren 50, mijn vroege kinderjaren.
Uit mijn eigen geheugen weet ik nog dat er een bloemen- en moestuin aan die kant van de boerderij lag, omzoomd met ligusterhagen, ongeveer 70 cm hoog. Met het maken van deze ligusterhagen in mini ben ik inmiddels begonnen.

Because it’s since many years now that I have plans to build in miniature 1:12 scale the farm of my grandparents, I’ve since then also gathered some pictures of the RL farm in the 50s. But the only picture of the rear side, the side of the kitchen, which is situated at the north, it this one here above. By the way, the kitten in this picture is trying to lick some milk from the milk bucket ...... clever kitten ;O).
I’ve always wondered why this picture was cut into half….it’s a bit odd: what was pictured on the other half…?
You can’t see much on it, but with a magnifier glass I vagely could still see some things. For getting more information, I’ve asked 25 years ago some (at that time still living) relatives about how some things have looked like then just after the midst of the 50s, in my early childhood.
From my own memories I know there was a flower and kitchen garden at that side of the farm, lined with privet hedges, of about 70 cm high. Meanwhile I started making these privet hedges in miniature.


Mijn plan is nu om stukken van deze bloemen-/moestuin in mini na te maken, maar om nu meters tuin te moeten na maken, enkel en alleen om ‘n paar foto’s te maken, vond ik te ver gaan. Het is niet alleen ondoenlijk, maar wáár laat ik die grote delen (opslag)? De (uit de kluiten gewassen) miniatuur boerderij bouwen en stofvrij opslaan in een kast is al niet mogelijk, laat staan een compleet boerenerf. Vandaar dat ik jullie nog steeds niets kan laten zien van de boerderij zelf, die nog steeds in stukken is opgeslagen in grote plastic bakken, simpelweg omdat ik er de ruimte niet voor heb L. Vandaar mijn besluit om de tuin in smalle stroken te bouwen, zodat ik die als coulissen kan gebruiken wanneer ik een scène van het boerenleven in de jaren ’50 aan jullie wil laten zien. Het doet me denken aan het landschap, waarin ik nu woon, het is in een kenmerkend zogeheten “coulisselandschap”, toevallig hè, of niet ;O)?

My plan is now for making smaller pieces of these flower and kitchen garden in miniature, because making more centimeters of garden, only for taking a few pictures, crossed the line for me. It’s not only impossible much work, but WHERE do I store those huge parts of garden? Building the huge miniature farm and storing it free of dust is just not possible for me, so a complete farmyard is completely out of my mind. That’s also why I still can’t show you nothing of the mini farm yet, which is now stored in parts in big plastic containers, simply because I don’t have enough space for it L.
Therefore is my decision to build the garden in small strips, so that I can use them as a sort of (theater) wings/scenes, when I want to show you a scene of farm life in the 50s. It brings me to the landscape, wherein I now live, it is a so-called characteristic “scenes/wings/coulisse landscape”, that's coincidentally, huh, or not ;O)?


Dus voor de corona crisis had ik al wat stroken MDF laten zagen en ben ik begonnen met het maken van de mini ligusterhagen. Eerst moet ik even zeggen dat ik jaren geleden al heel veel dingen heb verzameld, dus ik weet niet of het nu nog te koop is.
Ik heb in de voorgeboorde gaatjes stukje gedroogde tak gelijmd, die takjes had ik dus ook al voor dit doel gekocht bij het tuincentrum op de decoratieafdeling.

So, before the corona crisis started I’d already bought some strips MDF at the DIY and now I’ve started making the mini privet hedges. First, I must tell you that it has been years ago that I’ve started gathering many things fort his purpose, so I can’t tell you if things are still available/for sale.
In the pre drilled holes I glued in the dried small branches, which I’ve bought at the decoration section of our garden centre.


Voor dat ik verder ging, heb ik eerst het MDF in donkergrijs (matte krijtverf) geschilderd, ook een spaar millimeter aan de bovenkant van de zijkanten. Dit doe ik omdat als het MDF ietsje krom trekt door het beschilderen, je de zijkant kunt zien verschijnen en dat wil ik niet ;).

Before I continued, I fristly painted the MDF strip in a darkgrey (matte chalk paint), and also a few millimeter at the above side of the sides. I’ve done this because if the MDF will be warping a bit after painting, you can maybe see the sides and that’s a no go ;).


Na de donkergrijze onderlaag heb ik de stukken hier en daar bijgeschilderd met reebruine, lukraak gemengd hier en daar, met mosgroene krijtverf.

After the dark gray coat of chalk paint, I painted the pieces here and there with fawn brown, randomly mixed in here and there, with moss green chalk paint.


Toch was het niet naar mijn zin, het was veel te plat, er moest textuur in de ‘grond’ onder de heggen komen. Daarom heb ik de lagen nogmaals geschilderd maar dan door gebruik te maken van een acrylverf gemengd met een soort zand, gekocht in een modeltreinwinkel, op de foto zie je merk etc.

It was still not of my liking yet, it was way too flat, there had to be more texture in the ‘soil’ under the hedges. Therefore I’ve painted these layers again but than by using a sort of acyllic paint mixed up with a sort of sand, which I’ve bought it at a train modelling shop, on the picture you see the brand etc.


Ook na droging van het materiaal nodig vond ik het nodig om er nog één keer dezelfde laag op aan te brengen. Nu ben ik tevreden ;)!
Het volgende wat ik ga doen is het blad aanbrengen, maar dan moet ik eerst even gaan kijken wat voor materiaal ik daarvoor ga gebruiken. Wordt binnenkort vervolgd….

Also after it was dry I thought it was neccessary to add an extra layer of paint. Now I’m satisfied ;)!
The next thing I’ll do is gluing on the leaves, but therefore I firstly have to see of what material I’ll use. Soon to be continued….


(foto is bewerkt vanwege de privicay)
(photo is blurred due to the privacy)

Mijn pioenrozen stonden dit jaar prachtig in bloei, dankzij een speciaal dakje tegen de hete zon van de afgelopen periode. Hoe gek kun je op pioenen zijn ;)?!
Maar de foto daaronder is van mijn grote kleinzoontje, die houdt óók van de pioenrozen bij zijn moeder in de tuin, kijk maar hoe voorzichtig dat kleine manneke ruikt aan de bloemen...zó schattig ;O)!!
Dank voor jullie fijne reacties, allemaal een fijn weekeinde toegewenst!

My peonies were blooming beautifully this year, thanks to a special roof against the hot sun of the past period. How crazy you can be on your beloved peonies ;O)?!
But the photo underneath is of my big grandson, who also loves the peonies in his mother's garden, just look how careful that little boy smells at the flowers...soooo cute ;O)!!
Thank you for your kind comments, have a nice weekend!

Ilona

vrijdag 29 mei 2020

Heb je ook zo’n hekel aan aardappelen schillen…? / Do you also dislike to peel potatoes ...?

Dan heb ik dé oplossing voor je……..!
Than I have THE solution for you…….!


Koos heeft toch niks anders te doen, dus heb ik hem aan het werk gezet. 
In ruil voor iets lekkers doet Koos alles voor me….hoop ik.

Because Koos had nothing else to do, I put him to work. 
In exchange for a nice treat Koos does everything for me….I hope.


(foto is sterk vergroot, ik hoop dat jullie de vlek kunnen zien...?)
(photo is extremely enlarged, I hope you cen see the stain...?)

Koos zou graag ’n sigaartje roken tijdens het karweitje, maar hij mag van mini Oma niet binnen roken. Daarom heeft hij altijd een (niet brandende) sigarenpeuk in zijn mondhoek hangen, inclusief een blijvende tabaksvlek daar op die plek ;O).

Koos would like to smoke a cigar during his chores, but my mini Grandma don’t want Koos to smoke indoors. Therefore he always has a (not burning) stub of cigar in the corner of his mouth, inclusive a permanent tobacco stain there on that spot ;O).


Eerst heeft oma bij de waterpomp in de keuken een emmer vol water gepompt. 
Om water te simuleren, heb ik met een pons een rondje (van 25 mm in diameter) geponst uit een zeer dun vel transparante styreen voor modeltreinbouw. Het ligt los net onder de rand van de emmer, die gemaakt is door Aat Oukes, hij verkoopt zijn miniaturen op miniaturenshows, website: http://aatoukes.nl/  
Als je goed kijkt, zie je de weerspiegeling van mijn pincet in het ‘water’.

Firstly, at the water pump in the kitchen mini Grandma has pumped a bucket full of water. 
For simulating water I used a very thin styrene sheet, bought in a model train shop. Using a paper punch I cut a round shape of styrene sheet (of 25 mm in diameter). It lies lose just under the edge at the inside of the bucket, who is made by Aat Oukes, he sells his miniatures on minitures shows, website: http://aatoukes.nl/  
If you look well, you see the reflection of my tweezers in the ‘water’.


(sterk vergroot / greatly enlarged)

Daarna wordt het zelf in elkaar getimmerde aardappelschilbak, wat in de jaren ’50 bijna in elk huishouden voorkwam, gevuld met aardappels. Die aardappels waren verbouwd op eigen land door Opa, samen gerooid met Koos en nu gebruikt voor de maaltijd samen.

After that, the self-made wooden tray for peeling potatoes, which was quite common in almost every household in the 50s, is filled with potatoes. Those potatoes were grown on their own land by mini Grandpa, grubbed together with Koos and now used for meals together.


Een paar van de aardappels, gemaakt door mij van polymeerklei, zie je de uitlopers..?
Some of the potatoes, made by me out of polymer clay, can you see the offshoots...?


Geschilde aardappel van Fimoklei, de schil is gemaakt van dun papier.
Het aardappelschilmesje heb ik jaren geleden gekocht bij Miniatur Puppenwelt Wengen, tijdens een miniaturen show.

Peeled potatoe, the peel is made of thin paper.
The potatoe peeler is bought of Miniatur Puppenwelt Wengen during a miniatures show years ago.


Na een poosje stilte en alleen het plonzende geluid van geschilde aardappels in het water, is dít het resultaat: tadaaaa ;)!!
(aardappelen zijn door mij gemaakt van polymeerklei)

After a while of silence and only the splashing sound of peeled potatoes in water, this is the result: tadaaaa ;)!!
(potatoes made by me, out of polymer clay)


Goed gedaan, Koos, dankjewel, hier is je beloning…
Well done, Koos, thank you, here’s your treat….


Nu is het weer stil op mijn werktafel. Koos leest de krant, maar ik vermoed eerder dat hij nu moe is en stiekem eventjes een uiltje knapt ;).
Blijf gezond, zorg goed voor jezelf en anderen, vooral nu omdat de maatregelen versoepeld gaan worden hier in Nederland!!
Dank voor jullie fijne reacties, een fijn weekend toegewenst!

Now it’s quiet again at my work table. Koos is reading the paper, but I suspect that he’s tired now and he is secretly taking forty winks for a moment ;).
Stay safe, take care for others and yourselves, especially now here, in The Netherlands, where the measures of the corona virus lockdown will get being eased for a bit!!
Thank you for your kind comments, have a lovely weekend!

Ilona

vrijdag 22 mei 2020

De klompen van Koos / The wooden shoes of Koos


In mijn vorige blog bericht zei ik dat ik zal laten zien hoe ik de klompen van Koos (en mini Opa) zelf gemaakt heb. Ik zal het proberen uit te leggen door foto’s te laten zien, helaas ben ik niet altijd in de gelegenheid om foto’s te maken tijdens het maken. 
Deels komt dat omdat ik op een gegeven moment spontaan aan iets in miniatuur begin, dus dan denk ik totaal niet aan fotograferen.
Eerst doe ik wat onderzoek (boeken en/of op internet), begin dan met iets te maken en komt er dan soms toch nog iets wat ik kan gebruiken, en dan heb ik er geen foto’s van gemaakt. Ik denk dat sommigen van jullie dat zullen herkennen…maar ik zal mijn best doen om het proces uit te leggen.

In my previous blog post I told you that I will show you how I've made the wooden shoes of Koos (and of my miniature Grandpa) myself. I'll try to explain it by showing pictures, unfortunately I'm not always able to take pictures while taking. 
This is partly because at some point I spontaneously start something in miniature, so I completely don't think of photographing. 
First I do some research (books and/or on internet), than I start making something and sometimes something appears what I can use, and than I often don't have pictures of it. I think that some of you will recognise this...but I'll do my best to explain the process.


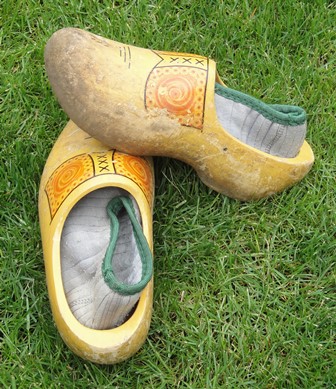
In Nederland worden klompen tot nu toe nog steeds gedragen, ik heb zelf al jarenlang klompen (zie deze foto’s) in gebruik als ik in mijn tuin werk, maar niét als ik uit ga, hoor ;).

Here, in The Netherlands, wooden shoes are still worn until nowadays, not as common footwear, but occasionally at work, by farmers and like I do for working in my garden. 
Since many years I use wooden shoes (see these pictures) when I’m working in my garden, but NOT when I’m going out, hehe ;).


Op mijn rechter klomp (links op de foto)  kun je zien dat het hout op de onderkant behoorlijk versleten is, dat komt omdat ik mijn rechtervoet gebruik tijdens het graven en kracht zetten.

On the bottom side of my right foot wooden shoe (the left one on the picture) you can see that the wood is quite worn out, that’s because I often use my rightfoot for digging.


Op deze foto, gevonden op het internet, zie je de verschillende fases tijdens het maken van échte klompen, zie hun website: https://klompenmuseum.nl/en/node/28902
En hieronder zie je hoe ik mijn miniatuur klompen maak.

On this picture, found on the internet, you see the different stages in making real life wooden shoes, see their website: https://klompenmuseum.nl/en/node/28902 (also in English!).
And here below you can see how I make my miniature wooden shoes.


Hierboven zie je de vormen die je uit de lindehouten lat moet zagen om ruw gevormde klompen te krijgen.
Here above you see the shapes you have to saw out of the basswood lath for getting roughly shaped wooden shoes.

(restant van de lindenhouten lat van 15 x 15 mm, na uitzagen van beide klompvormen)
(leftover of the basswood lath of 15 x 15 mm, after sawing the both shapes of the wooden shoe)

Oké, terug naar de miniatuur klompen van Koos, hier een (naar ik hoop duidelijke) beetje uitleg. Deze zijn op maat gemaakt voor zijn voeten, dat houdt in dat ik eerst voeten heb gemaakt van polymeerklei. Ik plak rondom een lindehouten lat (van 15 x 15 mm) een stukje schilderstape, waarop ik een klompvorm schets. 
Bovenop een schets van de klompvorm vanaf boven gezien, en aan één zijkant (en op exact dezelfde plaats op de lat) de klompvorm van opzij gezien. 
Daarna zaag ik met een figuurzaag éérst de vorm uit die de klompvorm van boven laat zien, waardoor ik een rechter- en een linker klomp krijg, anders krijgt Koosje last van zijn voeten natuurlijk. 
Daarna plak ik de uitgezaagde klompvorm in het hout opnieuw vast met schilderstape, waarbij ik de getekende vorm opzij vrij laat, anders kun je natuurlijk niet zien wat er als volgt uitgezaagd moet worden ;).

Okay, back to the miniature wooden shoes of Koos, here's a (I hope clear) bit of explanation.
These are made to fit just for his feet, which means that I firstly have made feet from polymer clay. Before I start I stick a piece of masking tape around a basswood lath (15 x 15 mm), on which I than draw with pencil the shape of a wooden shoe. On top of the lath I draw the clog shape seen from above, and on one side (and in exactly the same place on the lath) the clog shape seen from aside. 
Then I first saw out the shape with the  fret saw that shows the clog shape seen from above, so that I'll get a right footed and a left footed clog, otherwise Koosje will get pain at his feet. 
Then I put back again the sawn clog shape in the wood, than I taped off again the lath with painter's tape, but leaving the drawn wooden shoe shape on the side open, otherwise you can't see what needs to be sawn out as follows, of course ;).


(deze 'boortjes' hebben een diameter van 2 en 1 mm, en zijn prima geschikt voor het fijnere werk)
(these tiny 'drills' have a diameter of 2 and 1 mm, and are well suited for the finer work)

Nu heb ik een ruwe vorm van een linker- of rechter klomp, waarna ik start met het uithollen van de klompjes. Hiervoor gebruik ik speciaal gereedschap dat ik van mijn tandarts krijg. Het is al afgekeurd gereedschap, dus niet al te scherp meer, maar ik kan er nog steeds mijn mini klompjes mee uit hollen. Dit is een zeer tijdrovend werkje, want ik doe uren over het uithollen van één klompje. Het lijkt net of het hout dichter van samenstelling wordt, naarmate ik verder in de kern van het lindenhout kom…
Het is ook slecht voor mijn gewrichten dus doe ik het liever niet, maar soms komt er een speciale pop langs die erom vraagt ;).

Now I have a first, rough shape of a left footed, or a right footed wooden shoe, after which I start hollowing out the wooden shoes. For this I use special tools that I've got from my dentist. It is already rejected tools, so not quite sharp anymore, but I can still hollow out my mini wooden shoes with it. This is a very time consuming task, because I spend hours hollowing out one wooden shoe. It seems as if the wood gets denser in composition as I get further into the core of the basswood…
It is also bad for my joints so I prefer not to do it, but sometimes a special doll comes along and asks for it ;).


Nadat de klompen zijn uitgehold, moeten ze nog geschuurd worden met zeer fijn schuurpapier. Ook nu moet je weer heel goed opletten dat je niet te veel hout ineens weg schuurt, want dan zit je er zó doorheen (de wanden van de klompen meten bijna 1 mm dik) en kun je helemaal opnieuw beginnen is (helaas) mijn eigen ervaring.
De klompen van Koos moeten nog verweerd worden gemaakt, maar dat komt nog wel.

After I’ve hollowed out the wooden shoes, they have to be sanded with very fine sanding paper. Again you’ve to be very careful now and to take much care that you are not to sand away too much of the wood, because before you know it you will go through it (all sides of the wooden clogs are nearly 1 mm thick) and than you can start all the way from the first start is (unfortunately) my own experience.
The wooden shoes of Koos still have to be weathered, but that’s on my still to do list.


Omdat de polymeerklei voeten van Koos precies goed in verhouding waren met zijn lichaam, zou dat betekenen dat hij extreem grote klompen aan zijn voeten zou krijgen, dus totaal NIET verhouding! Koos zijn 'klei' voeten zijn niet plooibaar, dus daardoor kan hij nooit in de klompen stappen, dus heb ik helaas een stukje van 2 mm af moeten snijden (zijnde zijn tenen)…..

Because the polymer clay feet of Koos were exact right in proportion, it would mean that he would get extremely bigger wooden shoes at his feet, so totally NOT in proportion!
Koos his 'clay' feet aren’t pliable and because therefore he never would fluidly step into his clogs, so I unfortunately had to cut off a small piece of 2 mm (being his toes)…..


En zoals Birgit al vermoedde, heeft Koos zwarte, dikke wollen kniekousen aan zijn voeten gekregen, zoals gewoon was in de jaren ‘50. Kijk maar!
(voor de sokken heb ik zwarte tricotstof van een oud, dun t-shirt gebruikt)
Dank voor jullie fijne reacties, ik wens jullie een fijn weekeinde!

And as Birgit already did guess, Koos got black, thick woolen socks at his feet, until his knees as was common in the 50s. Look here!
(I used black tricot fabric of an old, thin t-shirt for the socks)
Thank you for your kind comments, have a nice weekend!

Ilona

vrijdag 15 mei 2020

Ontspannen kerel… / Relaxed guy


Ondanks dat hij zo ontzettend verlegen is, heeft Koos zijn gezicht al veel eerder laten zien hier op mijn blog. Hij was in 2012 te zien maar in een andere gedaante, Hendrik Jan genaamd. Voor diegenen die geïnteresseerd zijn, hier is de link: https://minimumloon.blogspot.com/2012/05/vandaag-was-het-zonnig-en-hondenweer.html
Op bovenstaande foto lijkt Koos net op een arrestant: handen tegen de muur, benen iets gespreid om hem te fouilleren, maar Koos is de goedheid zelve....

Despite of the fact that he is very shy, Koos has shown his face already much earlier here on my blog. He appeared in 2012, but than as an other person, named Henry John. For those who are interested, here is the link:
In the photo above, Koos looks like an arrested person: hands against the wall, legs spread slightly to search this suspect, but Koos is the goodness himself....


....en altijd hulpvaardig ;)!
....and always offering a helping hand ;)!


Nadat ik zijn gezicht heb bewerkt, ben ik zijn nieuwe lijf (gemaakt van Fimo klei) gaan aankleden, want als je zó verlegen bent als Koos, dan wil je niets liever dan gauw wat kleren aan je lijf, toch ;O)?
Eerst maar een broek en overhemd gemaakt voor Koos, en zijn voormalige muts op zijn kale koppie gezet.
Zoals veel mensen in die moeilijke naoorlogse jaren ’40 en ’50 werkt Koos heel erg hard voor zijn bestaan. Hij helpt de boeren als seizoenarbeider met allerlei zware klussen op het land, of de boerderij. Hij heeft grote eeltige handen en loopt wat scheef, dat komt omdat hij last van zijn rug heeft na jaren van zware lichamelijke arbeid, dit kun je zien aan de foto's, die van opzij zijn genomen.

After I’ve edited his face, I’ve dressed his new body (made of Fimo clay), because if you are so very shy as Koos is, you rather prefer to be dressed as soon as possible, huh ;O)?
Firstly I've made for Koos a pair of trousers and a shirt, and I put him his former bonnet on his bald head.
Like many people in those difficult years after WWII, in the 40s and 50s, Koos works very hard for earning a living. Working a seasonal worker, Koos helps the farmers with all kinds of tough jobs on the fields, or the farm. He has large, callous hands and walks a bit crooked, that's because he has problems with his back spine after years of heavy physical work, you can see this on the photo's, taken from aside.


Hierna was de spencer uit de jaren ’50 aan de beurt. Die is genaaid van een soort fijne tricot stof, die gelukkig wat mee kan rekken, zie hierboven waarom…

After that the spencer from the 50s was on turn. It’s sewn out of fine tricot fabric, which can luckily stretch a bit, see on the picture above why…


Ik werk het liefst met natuurlijke stoffen, zoals zeer dunne katoen en echte zijde, want die stoffen kun je vorm geven, als je ze iets verwarmd met je handen, kijk zo. Wil je kreukels in de stof dan kun je de stof ter plaatse verwarmen en met je warme vingers vormen of erin knijpen, zoals “knieën, of ellebogen” maken in een broek, of overhemd.
Voor Koos ben ik begonnen met het naaien van de lange naden in de katoen, maar de zomen onderin en de mouwen heb ik gelijmd met Tacky Glue. Als de lijm nog niet compleet droog is, kun je die gelijmde delen (de zomen) nog een beetje vormen naar het lichaam. Je moet dan natuurlijk al wel van tevoren weten hoe je pop eruit moet komen te zien ;).

I prefer to work with natural fabrics, such as very thin cotton and real silk, because you can shape those fabrics, if you heat them slightly with your hands, see here. If you want creases in the fabric, you can warm the fabric on the wanted spot and shape or squeeze them with your warm fingers, such as making “knees, or elbows” in trousers or a shirt.
For Koos I started sewing the long seams in the cotton, but I glued the hems at the bottom of the parts with Tacky Glue. If the glue is not yet completely dry, you can still shape that glue slightly to the body. Of course you have to know in advance what your doll should look like ;).


Om alle kleding op zijn gebogen lijf “in vorm te krijgen”, liet ik Koos een zogenaamde "fitness crunch" doen. Na het maken van deze foto moest ik hier namelijk aan denken en heb ik bij mijn kinderen nagevraagd hoe deze oefening heette: geen push up, maar een………? Het antwoord was dus een fitness crunch, hihihi, weer wat geleerd!
Ik had geen idee, hoe dat heette, maar ik ken wèl crunchy stukjes in mijn muesli ;).

For “getting in shape” all of the clothing on his bent body, I let Koos doing a so called "fitness crunch". After taking this picture I namely had to think of this, and I’ve asked my children how this particular fitness excercise was named: not a push up, but a…….? The answer was a fitness crunch, hehehe, I've learned something new!
I had no clue how it was called, but I do know crunchy parts in my muesli ;).


Zó, dat ziet er beter uit!
This looks much better!


Nu was het tijd voor een kapsel uit de jaren ’50, want Koos was in die tijd een buurman (een zogenaamde "noaber" genoemd, zoals nog steeds hier in de streek) van mijn mini grootouders (Huibrecht had het goed geraden ;O)).
In eerste instantie zag Koos er zo uit, maar ik vond het toch iets te veel oranje. Vandaar mijn keuze voor rode krullen, al was het bij Koos nog maar een randje (als je goed kijkt kun je zijn kale hoofd zien, net onder de rand van zijn pet ;O) ). Koos is inmiddels aardig op leeftijd, maar hij is nog steeds trots op zijn rode haar.

It now was time for a hairdo of the 50s, because in that time Koos was a neighbour (a so called "noaber" in Dutch regional dialect) of my mini grandparents (Huibrecht guessed it right ;O)).
At first Koos looked like this, but I thought it was too much of orange. Therefore my choice of red curls, allthough it was just a narrow edge of hair (if you look well, you can see his bald head, just underneath the rim of his cap ;O)  ). Koos is at age by now, but he is still very proud of his red hair.


Terwijl Koos zijn haren geknipt werden, zat hij zenuwachtig aan zijn pet te friemelen, want hij zit niet graag zonder zijn pet.

While Koos had his hair cut, he was nervously fidgeting at his cap, because he doesn't like to be without his cap. 


Zo gauw Oma klaar was met zijn haren te knippen, ging de pet direct weer op zijn hoofd, want dan leek het of hij nog al zijn haar had ;).

As soon as Grandma was done with cutting his hair, his cap went back on his head instantly, because it than seemed as if he still had all his hair ;).


Koos is nu nog blootsvoets maar ik ben al bezig om voor hem een paar nieuwe klompen te maken.
Hoe ik de klompen maak, laat ik de volgende keer zien.
Dank voor jullie fijne reacties, ik wens jullie een fijn weekeinde!

Koos is still barefoot but I am already making a pair of new wooden clogs for him.
I'll show you how I make the wooden clogs next time.    
Thank you for your kind comments, I wish you all a nice weekend!

Ilona