my e-mailaddress


Posts tonen met het label 1:12 miniatuur schuifraam / 1:12 miniature sash window. Alle posts tonen

dinsdag 6 april 2021

Jaaa, ik weet dat ’t saai is..… / Yes, I know it’s boring…..

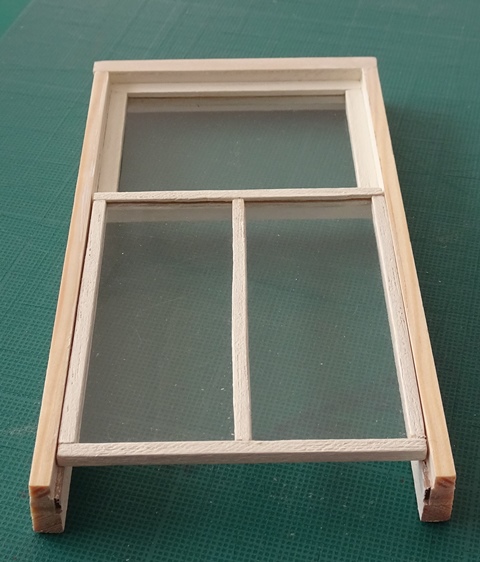
….maar hier is het voorlopig laatste deel over het maken van dit schuifraam.
In het echte leven worden dit soort schuiframen d.m.v. gewichten en een raamtouw (bevestigd aan het schuivende deel) omhoog geschoven. De gewichten zijn verwerkt in het kozijn, waarin een holte zit waardoor de gewichten op en neer kunnen bewegen. Ondanks dat het voor mij niet mogelijk is om deze zware gewichten in miniatuur te maken, heb ik het kozijn tóch met latten afgetimmerd, zoals dat ook in het echte leven het geval is. Alle latten en vensterbank liggen nog los, niets is vastgelijmd want dat kan pas als de aangrenzende woonkamer/buitenmuur ook klaar zijn.
 
….but for now here is the last part of making this sash window.
In real life, these types of sliding windows are closed and opened by means of weights and a special rope for the window (attached to the sliding part). The weights are incorporated in the window frame, which has a cavity that allows the weights to move up and down. Because it is not possible for me to create these heavy weights in miniature, I still finished the window frame with slats, as this is actually done in real life.
All slats and windowsill are still loose, nothing is glued down yet because that is only possible when the adjoining living room/outside wall are also ready.

Toen ik het kozijn met afdeklatjes wilde afwerken, merkte ik echter een fout op. Ik had de binnenkant van dit hele raam wit geschilderd, wat dom :O!! Ik heb namelijk ’n paar foto’s van deze ramen, weliswaar in slechte kwaliteit, maar hier op is duidelijk te zien dat de binnenkant van alle ramen gevernist zijn en niet wit geschilderd. Ach ja, kan gebeuren, dan is dit gewoon het eerste raam dat (na 50 jaar trouwe dienst) wordt vervangen door een nieuwe, toch 😉?!
 
However, when I wanted to finish the frame for the slat finish, I noticed that I made a mistake. I painted this whole window white on the inside, how stupid :O!! Because I have a few pictures of these windows, although in poor quality, but here you can clearly see that the inside of all windows are varnished and not painted white. Ah well, can happen, then this is just the first window that is replaced by a new one (after 50 years of loyal service), right 😉?!


Als afwerking van smalle latjes heb ik gebruik gemaakt van een houten jaloezie, die hele fijne lamelletjes van 5 mm breed bevatte. Ik heb deze jaloezie vele jaren geleden gevonden in de kringloopwinkel, ik denk dat het zacht lindenhout is en zag er toen al direct mogelijkheden voor.
Met een houtsnijder heb ik de latjes haaks gesneden. De houtsnijder was al jaren niet meer gebruikt, dus tijdens gebruik kwam ik er tijdens het hout plaatsen achter dat het mesje in de hendel (boven) knap scherp was. Ik had het amper geraakt toen er al een ‘ongelukje’ had plaats gevonden voordat ik opmerkte dat er een snee in mijn vinger zat. Och jee 😱, ook dat nog, lesje geleerd: hout snijden en géén vingers, gauw een pleister erop, en klaar!

 
As a finish with small slats I used a wooden venetian blind, which contained very fine slaths of 5 mm wide. Many years ago I found this wooden blind in the thrift store, I guess it's soft lime wood and right then I directly saw opportunities for using it for mini work.
Using a woodchopper for minis I've cut the slats at right angles. The woodchopper had not been used for years, so while using it I found out during the placement of the wooden slat that the knife in the handle (above) was pretty sharp. I had barely hit it when a 'little acciden' had already occurred before I noticed there was quite a cut on my finger. Oh dear 😱, another accident, lesson learned: chopping wood and no fingers, I quickly put on a band aid, and done!


De stijlen van het raamkozijn rusten op een zandstenen vensterbank, die ik heb nagebootst met grijze/beige krijtverf op het hout. Ik werk de vensterbank nog netter af als de ramen op hun definitieve plaats worden ingezet en vast gelijmd. Voordat ik het zou vergeten heb ik de binnenkant van de deklatjes, nadat ze wit geschilderd waren en goed gedroogd, ook ingesmeerd met kaarsvet.

The standing posts of the windowframe rest on a sandstone windowsill, which I imitated by painting the wood with gray/beige chalk paint. I'll finish the windowsill even more neatly when the windows are put in their final position and glued. Before I would forget, after they had been painted white and dried well, I also smeared some candle wax on the inside of the covering slats.


Het vensterbankje aan de binnenkant is gemaakt van een ‘hardhouten’ latje ooit gekocht op een miniaturenbeurs. De afwerklatjes en vensterbank zijn met een heel dun laagje gebeitst in eiken kleur.
Het raam kan nog niet op zijn plaats gelijmd worden want dan moet de aangrenzende woonkamer ook klaar zijn, dus ik hoop dat het onderste deel van het raam, na afwerking, écht kan schuiven.
 
The windowsill on the inside is made from a ‘hardwood’ slat which I once bought at a miniature fair. The finishing slats and windowsill are stained with a very thin layer, in oak color.
The window cannot be glued in place yet because then the adjoining living room must also be ready, so I hope that the bottom part of the window can really slide after finishing.


De raamgrepen zijn gekocht, ik weet niet meer van welk merk. Ze waren goudkleurig en ik heb ze met nagellak wit geschilderd. Afgeknipte kopspelden dienen als ‘schroef’ en ze zijn vastgezet met secondenlijm.
 
The handles for the window were bought, I don't remember what brand they are. They were gold colored and I painted them white with nail polish. Clipped pins serve as 'screws' and have been secured with superglue.

Birgit vroeg mij in een reactie op mijn vorige blogbericht om een paar foto’s van mini Oma en Kleine Ikke, die samen uit het raam zwaaien, nou, dan moet ik eerst iets uitleggen voordat ik dat doe. Dit raam is korter en smaller dan de andere ramen omdat er een  verschil is in hoogte van de vloer van de opkamer. Dus dit raam zit ongeveer op 25 cm boven de vloer van deze kamer (zie foto boven). Dus dat betekent dat mini Oma plat op de grond moet gaan liggen om dan ergens boven haar hoofd een arm naar buiten te steken en te gaan zwaaien…??

Birgit left a comment on my previous post inwhich she asked Grandma and Little Me waving out of the window, well, than I have to explain something before I do this. This particular window is shorter and more narrow than the other windows because of the difference in height of the floor is for the up stairs room. So, this window is about 25 cm above the floor of this room (see above picture). So, that means mini Grandma had to lie down flat on the floor, putting an arm above her head, and than stick an arm outside the window just for waving…??


Ik denk dat ik  dit écht niet kan vragen van mijn mini Oma, die ver in de zestig was en zwaar diabetes was. Maar ik vond het idee van Birgit leuk, dus ik dacht laten we wat foto’s maken van haar en Kleine Ikke, maar dan aan de buitenkant voor dit raam 😊.

Maar als deze kant van de boerderij klaar is, inclusief de ramen, dan zal ik nieuwe foto’s maken zodat jullie hen van binnen voor het raam kunnen zien, oké??
 
I really can’t ask this of my mini Gradma, who was far in her sixties and suffered of severe diabetus. But I liked the idea of Birgit, so I thought: let’s make some pictures of her and Little Me at the outside of this window 😊.
But if when this side of the farmhouse will be finished, including the windows, I’ll make new pictures so you can see them inside for the window, deal??


Hierboven kunnen jullie ze nog eens samen zien, zo ziet de opkamer er tot nu toe van boven gezien uit. Alles zit vast getaped, nog niets is vastgelijmd.
Let op het zogenaamde 'koeraampje', meer hierover zie verderop in dit bericht.

Above you can see them together again, this is how the upstairs room looks like from above so far. Everything is taped together, nothing has been glued yet.
Pay attention to the so-called small 'cow window', more about this later in this blog post.

Ik heb nòg een foutje gemaakt: bij het uitzagen van het raamopening, heb ik geen rekening gehouden met de 4 mm dikke vloer. Gelukkig kan ik dit nog wel wegwerken maar het was een goede waarschuwing voor de rest van de bouw, want de bouwtekening die ik gemaakt heb, is meteen aangepast.
 
I still made another mistake: when sawing out the window opening, I did not take the 4 mm thick floor into account. Fortunately, I can still cover this up, but it was a good warning for the rest of the construction, because the construction drawing I made, was immediately adjusted.


(aan deze kant komt nog een muur / at this side there will be another wall)

Op deze zelfde foto (van de opkamer in wording) is ook het “koe raampje” te zien, dat is een raampje hoog in de muur dat uitkijkt op de koestal. Door de aanwezigheid van dit kleine raampje in de opkamer (= zijn slaapkamer) hoefde mijn Opa ’s nachts niet helemaal naar de stal te lopen om te zien hoe ver een koe was die ging kalven, of ziek was.

The same photo (of the up stairs room in progress) also shows the so-called "cow window" (literally translated from Dutch), a window high in the wall of the room on the stairs that overlooks the cowshed. The presence of this small window in the upstairs (=his bed)room meant that my grandfather did not have to walk all the way to the barn at night, to see how the situation of a cow was that was about to calve, or was sick.

Als laatste wil ik proberen om een zeer kort filmpje te uploaden, dan kunnen jullie zien dat het schuifraam echt werkt. Ik heb alleen geen idee of het korte filmpje ook op mijn blog werkt?? Ik heb dit nog nooit eerder gedaan dus….we zullen ’t gaan zien.
Blijf veilig en gezond, zorg goed voor elkaar en jezelf!
Dank voor jullie fijne reacties, allemaal een mooie week toegewenst.

 
Finally, I want to try to upload a very short movie, so you can see that the sash window really works. I just have no idea if this video also will work on my blog ?? I've never done this before so…we'll see what happens.
Stay safe and healthy, take care of each other and yourself!
Thank you for your kind comments, I wish you all a lovely week.

 
Ilona

zaterdag 27 maart 2021

Laat maar schuiven…! / Let’s slide….!

Ik vind het leuk om af en toe met woorden te spelen, maar om die woordgrapjes dan ook nog eens in fatsoenlijk Engels te kunnen vertalen……nou, dàt is knap moeilijk voor mij! Maar toch blijf ik het proberen, om jullie toch nog een kleine glimlach te bezorgen in deze moeilijke tijd!
(Toch denk ik dat beide woorden, schuiven en ‘slide’, in dit geval wel samen gebruikt kunnen worden..?? Zo niet, laat me dat dan even weten)
 
Now and than I like to play with words, but to be able to translate those puns into proper English (and for all of you to understand the pun right).....well, that's pretty difficult for me, but still I'll stay trying to do this, just for giving you a little smile in these troubled times!
(Still, I think both words: 'schuiven (Dutch for slide) and slide' can be used together in this blog post title......but if not so, please, let me know)

Maar wàt schuift er dan..? Nou, een schuifraam voor in de opkamer van mijn mini boerderij (zie boven het 1:1 raam van de opkamer). In eerste instantie wilde ik gewoon dichte ramen in de boerderij maken, maar zeg nou zelf: ’s morgens na het slapen je slaapkamer luchten is wel zo wenselijk, niet 😁!?
 
But what slides then...? Well, a so called sash window, for in the up stairs room of my mini farm (see above picture of the real life window). At first I just wanted to make closed windows in the farm, that's more easier to do, but say for yourself: ventilating your bedroom in the morning after sleeping is quite desirable, isn’t it 😁!?

(foto/picture van/of Wikipedia)

In mijn jeugd woonden wij in een oud huis met schuiframen, die op dezelfde manier werkten als die van de boerderij van mijn grootouders. Dus weet ik nog uit eigen herinnering hoe die ramen bij ons thuis functioneerden.
Om dat schuifraam voor de opkamer in miniatuur te kunnen maken (althans iets wat er op lijkt), heb ik op internet gezocht naar hoe een echt werkend schuifraam geconstrueerd was.
Bovenstaande foto is dus van Wikipedia, voor meer informatie, zie hier: https://nl.wikipedia.org/wiki/Schuifraam
 
In my childhood, we lived in an old house with this sort of sash windows, which did work the same way as the ones in my grandparents' farm. So I can still remember from my own memory how those windows functioned in our home.
To be able to make that sliding window for the upstairs room in miniature (or at least something similar), I looked on the internet to find out how a real working sash window was constructed.
The above picture is from Wikipedia, for more information, see here: https://en.wikipedia.org/wiki/Sash_window

Maar éérst dit: ik verzamelde alle houten latjes die ik had. I.v.m. de pandemie kon ik dit alles nu eens mooi uitzoeken: sorteren op houtsoort en op maat, zodat ik de volgende keer dit niet steeds weer moest doen, dus aan de slag ermee!
 
But first I had to do this: I collected all the wooden slats I had in stock. Good thing to do now during this pandemic: to sort this all out to type of wood and to size, so next time I don't have to do this again and again, so get started!


Ik ben wéken aan het nadenken geweest over hoe ik dat raamkozijn nu eens kon gaan maken, maar elke keer als ik naar die constructie tekening van Wikipedia keek, snapte ik wèl hoe het raamkozijn in elkaar zat, maar niet van HOE ik dit moest vertalen naar 1:12 schaal, EN met maar net 12 mm diepte aan ruimte om in te werken 😳??? Dàt was mijn probleem.
Uiteindelijk heb ik de tekening vereenvoudigd en ben ik er maar gewoon aan begonnen. Na een aantal pogingen is het me gelukt om een soort van kozijn op te bouwen dat ik kon gebruiken om er een raam in te laten schuiven. Ik heb een latje van 3 x 3 mm, eentje van 4 x 4 mm en eentje van 5 x 5 mm aan elkaar gelijmd met contactlijm.

I spent weeks thinking about how I could make that window frame, but every time I looked at that construction drawing from Wikipedia, I DID understand how the window frame was put together, but not HOW to translate this into 1:12 scale, and having just 12 mm in depth to work in 😳??? THAT was my problem.
In the end I simplified the drawing and just started on it. After a number of attempts, I managed to build some kind of window frame that I could use to slide in a window. I glued a small slat of 3 x 3 mm, one of 4 x 4 mm and one of 5 x 5 mm together with contact glue.


Als bovenlat van het kozijn heb ik ander hout gebruikt. Aangezien ik geen dik hout had van die maat, ben ik in mijn schuur gaan zoeken en vond een houten afwasrek van Ikea terug. Hieraan zat een lat die voldoende breed was voor de bovenlat EN om er een diepe vensterbank uit te zagen, joepiiiieee, de dingen die we doen om mini’s t maken, hè?!
 
I used different wood as the top bar of the window frame. Since I did not have a wooden slat of that size, I went looking in my shed and found a wooden dish rack from Ikea. To this was a bar that was wide enough for the top bar AND also wide enough for sawing out a deep windowsill, yippiiiieee, the things we do for making mini’s, huh?!


Dus heb ik de bovenste balk (er moest nog aan beide zijden een één millimeter latje bij) en de vensterbank uit het Ikea hout gezaagd. De vensterbank maakte het mij nog even ietsje moeilijker: die heeft net buiten het raam, een hellingshoek van 20o. Die hoek was niet zo moeilijk om te zagen, maar na het afzagen was ik ook mijn aanwijzingen, die ik er met potlood bovenop had gezet, kwijt…..tja, kan gebeuren. Met de figuurzaag heb ik het profiel van het raamkozijn uit de vensterbank gezaagd, zo zat de constructie niet alleen stevig, maar later zou ik hier niet meer bij kunnen natuurlijk...
 
So, I sawed the top beam (both sides needed a slath of 1 millimetr extra) and the windowsill out of the Ikea wood. The windowsill made it just a bit difficult for me: it has an angle of inclination of 20o, just on the outside of the window. That angle of inclination was not the difficulty, but after sawing off this side of the wood, I also lost my notes I had drawn in pencil on the top…...well, can happen. Using the fretsaw I sawed out the profile of the window frame out of the windowsill, this way the construction was not only sturdy, but I would not be able to access it later on, of course...


Nu ik het raamkozijn zo ver in elkaar had gezet, kwam het volgende onderdeel om de hoek kijken: het schuifraam zelf, mèt vast bovenraam (in een ruimte van slechts 7 mm diep). Hiervoor had ik wel de latjes maar er kwam nog iets anders bij kijken, het inkerven van gleuven om het glas (styreen sheets) in te zetten. Hierover meer in de volgende blog post, ik ga nu eerst het raamkozijn in de grondverf zetten 😉.
Blijf veilig en gezond, zorg goed voor elkaar.
Dank voor jullie fijne reacties, een heel mooi weekeinde toegewenst!

 
Now I had assembled the window frame this far, the next part came into play: to make the sash window itself, with a fixed upper window (in a space of just about 7 mm deep). I had the slats for this job, but there was something else involved, the notching of grooves for inserting the glass (styrene sheets). More about this in my next blog post, part two f how to make a sash window,  first I'm going to prime the window frame 😉.
Stay safe and healthy, take good care of yourself and each other.
Thank you for your kind comments, have a lovely weekend!

 
Ilona