

Vroeger, in de jaren ‘50 en ’60, was een zwabber een
noodzakelijk huishoudelijk apparaat om de gladde vloeren (linoleumvloeren)
stofvrij te houden. Mijn moeder had er eentje in huis, dus mijn Oma zal er
ongetwijfeld ook eentje hebben gehad.
Zoals ik in mijn laatste blog bericht voor mijn ‘vakantie’ beloofd heb, is hier dan de tutorial van de zwabber van vroeger, in miniatuur.
Back in the 50s and 60s, a vintage swab/mop was a
necessary household appliance to keep smooth floors (linoleum floors) dust-free.
My mother used one at home, so my grandmother undoubtedly also had one.
As promised in my last blog post before my ‘vacation’, here
is the tutorial of the vintage mop, in miniature.


Het idee om een zwabber in mini te maken, begon met het opnieuw borduren van het tafelkleedje met de haan, dat ik van Birgit had gekregen. Van dat kleedje heb ik toen een flink stuk van de franjes af moeten knippen om het in schaal 1:12 te krijgen. Terwijl die franjes op een hoopje lagen om weg gegooid te worden, moest ik denken aan de haren van de zwabber, die wij vroeger thuis ook hadden. Dus werden de franjes niet weggegooid, alleen de lichtgrijze franjes heb ik bewaard.
The idea of making a miniature mop started with the re-doing of the embroidery of the
table cloth with the cock, which I got of Birgit. Back then I cut off quite
some excess of the fringes of that cloth, for getting it into scale 1:12. While
those fringes lay on a heap for throw them away, they reminded me at the hairs
of the mop, we used to have at home in the past. So all of these fringes
weren’t thrown away, only the light grey fringes were kept behind.

Voordat ik me het hoofd zou breken over hoe de steel en karakteristieke houder te maken, besloot ik eerst te kijken hoe ik die haren bij elkaar kon ‘binden’. Het gemakkelijkste was een stukje ruitjespapier te nemen, daarop 35 mm af te tekenen (elk ruitje is 5mm) en daarop de haren/franjes te leggen. Vervolgens kwam de naaimachine er aan te pas om de haren met de kleinste stiksteek, die mijn machine heeft, vast te naaien op het ruitjespapier. Ik heb twee lagen franjes gemaakt, zodat de zwabber mooi ‘vol’ zou zijn.
Before I was racking my brains about how to make the handle and characteristic broom holder, I decided to see how I could "tie" those loose hairs together. The easiest way was to take a piece of graph paper, mark it 35 mm (each diamond is 5 mm) in between two pencil lines and lay the hairs / fringes on it. Then the sewing machine was used to sew the hair, to the graph paper, by using the smallest lockstitch my sewing machine has. I made two layers of fringes so that the mop would be nicely "full" of hair.


Ondanks dat het ‘haar’ mooi lichtgrijs was, wilde ik het
toch meer muisgrijs, omdat de zwabber na jaren trouwe dienst meestal wat
donkerder grijs van kleur was.
Ik heb de aan elkaar gestikte lagen haar daarom in de
donkergrijze aquarelverf gelegd en na een poosje uitgespoeld, ik moest dit nog
een paar keer herhalen om het grijs donker genoeg te krijgen.
Laat de linnen haren goed drogen daarna, of gebruik een
föhn, anders willen de haren niet gemakkelijk plakken aan de houten bezem.
Although the ‘hair’ had a nice light gray, nearly white, I
still wanted it to get a more mouse gray, because after years of loyal service
the mop was usually a bit darker gray in color.
I therefore put the layers of hair (stitched together) in
dark gray watercolor paint and then after a while I rinsed it out, I had to
repeat this proces a few more times until I got it a more darker gray color.
Let the linen hair dry well afterwards, or use a hair dryer,
otherwise the layers of hair can won't be glued easily to the wooden broom.


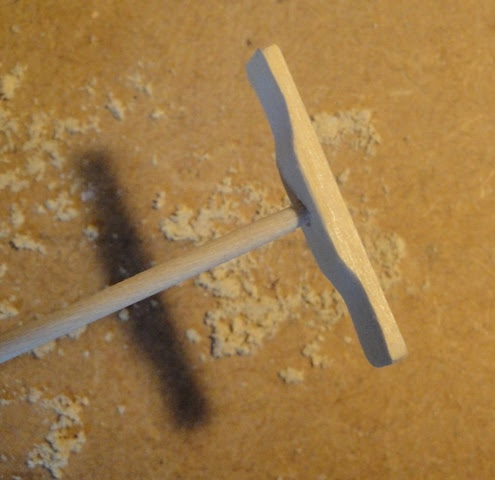
Nu zijn we op het punt om het houten gedeelte van de zwabber te maken. Ik heb hiervoor lindenhout gebruikt van 5 mm dik, 10 mm breed en 35 mm lang, omdat er wat volume verlies van het hout zal zijn doordat het flink in model geschuurd gaat worden met behulp van mijn Dremel.
Now we are about to make the wooden part of the mop. For
this I have used lime wood of 5 mm thick, 10 mm wide and 35 mm long, because
there will be some loss of volume of the wood because it will be heavily sanded
into shape, using my Dremel machine.


Voor de steel heb ik een satéprikker gebruikt, die taps werd bij geschuurd. In het houten middengedeelte van de zwabber werd schuin een gaatje geboord van 2,5 mm, zodat het zwabberen ‘ergonomisch verantwoord’ was ;).
For the mop handle I used a skewer, which was sanded tapered. A 2,5 mm hole was drilled diagonally in the wooden middle part of the mop, so that swabbing was "ergonomically responsible" ;).


Lijm de haren op het houten gedeelte, laat goed drogen, lijm daarna als laatste de op maat gemaakte steel in de zwabber. Schuur het boveneinde van de steel mooi rond af, en indien je de zwabber wilt ophangen, dan kun je in de steel een 1 mm groot gaatje in boren.
Om het een beetje echt te laten lijken, heb ik er wat (schoon!) stof op de haren gewreven, het waren de pluizen uit mijn wasdroger ;).
Glue the layers of hair to the wooden part, let it dry well, then finally glue the tailor-made handle in the wooden part of the mop. Sand the top end of the handle nicely round, and if you want to hang the mop on a hook, you can drill a 1 mm hole in the top part of the handle.
To make it look a bit real, I rubbed some (clean!) dust on the hair, it were the fluff from my dryer ;).

Als laatste heb ik de steel wat beschadigd, hopelijk kun je het zien?? Als ik vroeger moest zwabberen, dan moest hij uitgeklopt worden via het slaapkamerraam. Dat deed ik door de zwabber met de steel op buitenkant van de vensterbank te steunen en dan hard de steel rond draaien, de vlokken vlogen mij dan om de oren en in ‘t haar, MAAR……..de vloeren waren stofvrij ;O)!
Finally I damaged the handle a bit, hopefully you can see it ?? Why? Well, in the past, if I had to swab, the mop had to be freed of dust by knocking it out through the bedroom window. I did this by supporting the mop with the handle on the outside windowsill, and then turning it hard around with one hand and by holding the handle in the other hand, the flakes then were flying everywhere including my face and hair, BUT………the floors were dust free ;O)!


Hierna heb ik het houten gedeelte van de zwabber glanzend gelakt (zoals wij die
vroeger thuis hadden) en daarna weer een beetje afgeschuurd. Het is en blijft een
huishoudelijk gebruiksvoorwerp, he?!
Ik herinnerde mij ook de vilten randjes, die op de hoeken
van de zwabber zaten. Dat was gedaan om bij het schoonmaken geen dingen kapot
te stoten, zoals onder kasten en bedden door zwabberen en dan per ongeluk het hout
van de meubels te beschadigen. Ik heb hiervoor hele dunne randjes van
helderrood, zelfklevend fluweel geknipt, van bijna 1 mm breed en op de zwabber
geplakt. In het echt zaten ze vast met zilverkleurige knopspijkertjes, die heb
ik geïmiteerd door stipjes zilverkleurige nagellak met een fijne speld op het
vilt te zetten. Ik hoop dat jullie ze kunnen zien?
After this I painted the wooden part of the mop with a
glossy varnish (like we used to have back then at home) and then I sanded a bit off
again. It is and remains a household utensil though, huh ?!
I also remembered the bright red felt edges on the corners
of the mop. This was done in order not to damage things during cleaning, such
as swabbing underneath cupboards and beds and then accidentily damage the wood of
the furniture. For this I cut very thin edges of self-adhesive velvet, tried to
stay under the 1 mm wide, and glued them to the mop. In reality they were stuck
with silver-colored button nails, which I imitated by putting dots of
silver-colored nail polish on the felt with a fine pin. I hope you can see
them?


Nou, ik denk dat we nu genoeg hebben gezwabberd, die ruimen we netjes
op. Mini oma zet hem in de kleding kast, vanwege ruimtegebrek in de
slaapkamer…..:O!!
Ik hoop dat jullie iets aan deze tutorial zullen hebben,
veel plezier ermee.
Blijf veilig en gezond, houd je goed aan de maatregelen,
want het is weer goed mis met het Corona-virus in verschillende delen van de
wereld, zorg goed voor elkaar en jezelf.
Dank voor jullie fijne reacties, fijn weekeinde toegewenst.
Well, I think we have mopped enough for now, we will tuck it away. Mini grandma has put it in her clothes cabinet, due to the lack of space in her
bedroom…..:O!!
I hope you’ll like this tutorial, have fun in making it.
Stay safe and healthy, remember the measures in your
country, because in several parts of the world the Corona-virus striking hard
again, take care for each other and yourselves.
Thank you for your kind comments, have a nice weekend.
Ilona
18 opmerkingen:
Wow! That's amazing. It looks awesome! When I'm feeling really patient I'll have to try this!
Ése trapeador, o mopa como lo conocemos aquí, ha quedado fabuloso! Se ve tan real sobre todo en las manos de la abuela! Muchas gracias por el tutorial Illona!
Cuidaros mucho.
Besos.
Muy bien explicado y detallado. Buen trabajo de dremel, que no es facil con ese tamaño (lo se por experiencia). enhorabuena. a ver si encuentro unos pelos para poder imitarla
Excellent tutoriel, cette vadrouille était et serait encore très utile pour éviter de passer l'aspirateur. c'est encore mieux et plus écologique que le balai avec les lingettes.
Continuons à prendre soin les uns des autres, car oui, hélas, le virus est toujours présent.
Bises. Bon week-end Ilona !
Your mop is fantastic and its tutorial excellent.
We still have to be careful as the situation is not improving at all.
Take care!!!
Geneviève
que buen tutorial ...
El resultado es fantástico !!!
What a great tutorial! Grandma wields her new dust mop as if she has had it all her life. Thanks so much!
Thank you dear Ilona for this very well explained tutorial. I still have one similar broom but instead of the soft mop-like hair, it has dark, rough horse-hair. I haven't used it for years but was glad that I kept it, It was useful at the time of the renovation of our building.
Take good care and keep safe!
Hugs, Drora
¡Como siempre, de un impresionante realismo!
Thanks for sharing this very well illustrated and explained tutorial with us - and of course for the time and work that went into this. And best of all we don't just learn how we could create a stunningly realistic mop - it also shows very well your attention to any single detail. Using fluffy stuff from the dryer for adding a touch of dirt is an idea only you could have... very creative.
But I must admit what I like most of all about this tutorial is seeing the pictures of Grandma using her fantastic mop. She's such a wonderful miniature character! I only wonder now if she would have appreciated storing a dirty mop in her cupboard... ;O)
Hugs
Birgit
Thanks for the tutorial. Your mop is fantastic and so realistic. Great!
Leuk dat je de tutorial uitgewerkt hebt. Er zullen veel mensen blij mee zijn. Groet, Thea
Oh, Ilona, I love your mop, it´s so realistic. I admire the precision of your work, you really think of everything, nothing escape to your fine eye. Great job. Thank you for the tutorial 😊.
Clever lady!! It looks totally authentic and Grandma will be pleased.
Rx
I remember my grandma making me take one outside to clean the dust off...everything was ok until the wind changed and I got dust in my face. oh good times :)
Es perfecto.
El tutorial muy bien explicado.
Un saludo
I absolutely adore your mop, Ilona. It is so realistic, it makes me long to have one too. Thank you for the tutorial, I might just try it some time.
Een reactie posten