my e-mailaddress


dinsdag 31 januari 2017

16e eeuwse Hollandse gotische eiken kist / 16th century Dutch gothic oak chest


Afgelopen zondag was ik in de gelegenheid om naar de miniaturenbeurs in Houten te bezoeken, even heerlijk snuffelen naar leuke/mooie miniaturen. Ik was op zoek naar miniaturen, waarop ik mijn miniatuurbloemen kan presenteren, als ik weer op de DHN-show in Arnhem sta in maart.
Bij Arjen Spinhoven, website: http://arjenspinhoven.nl/ heb ik deze eiken kist gevonden. Ik zocht eigenlijk voor mijn gestreepte tulpen (17e eeuw) een geschikte tafel, maar Arjen had geen tafel uit die tijdperiode, dus het werd deze 16_eeuwse kist.

Last Sunday I was able to visit the miniature show in Houten, nicely nosing around for nice/wonderful miniatures. I was searching for something, whereon I can put my miniature flowers in the displays. Because I will attend again the DHN-show in Arnhem in March.
At the table of Arjen Spinhoven, website: http://arjenspinhoven.nl/ I found this chest. For displaying my striped tulips (17th century) I was actually looking for a suitable table, but Arjen had no table from that time period, so I bought this 16th century chest.


Vandaag heb ik deze kist in elkaar gezet, het was niet zo moeilijk, dankzij de duidelijke ingesloten instructies. Daarna heb ik de kist, gemaakt van mdf, bewerkt met acrylverf volgens de methode van het “houten”. Misschien dat sommigen van jullie zich deze techniek nog herinneren, want ik heb het ook gebruikt voor het broodkastje, zie deze blog: http://minimumloon.blogspot.nl/2016/09/nederlands-broodkastje-uit-de-17e.html

Today I've put the chest together, it wasn’t difficult to do, thanks tot he clear included instructions. After that I edited the chest, made of mdf, with acrylic paint, using a technique named “houten” in Dutch. This means: creating wood grain with paint, maybe that some of you do remember this technique, because I’ve also used it for the bread cabinet, see here: http://minimumloon.blogspot.nl/2016/09/nederlands-broodkastje-uit-de-17e.html


Ik gebruik altijd een basiskleur acrylverf, die geschikt is voor het hout dat je wilt imiteren. Voor het verkrijgen van dit eikenhout heb ik de kleur ongebrande Siena gebruikt, gevolgd door  twee verschillende, donkerdere bruintinten, die ik gebruik om de nerven te schilderen. Het is een geduldkarweitje, maar dan heb je ook wat ;)!

I always use a basic color of acrylic paint which is suitable for imitating the desired sort of wood. For getting this oak wood I used the color raw Sienna, followed by two different darker shades of brown, which I used for painting the wood grain. This chore requires great patience, but it’s worth it ;)!


Op bovenstaande foto’s kun je al wat van het resultaat zien, ik ben nog niet klaar met de scharnieren. Hup, gauw een vaas met gestreepte tulpen erop en een foto gemaakt. Helaas een moderne vaas, maar ik had geen tijd te verliezen met zoeken: het kon nog nèt voor het te donker werd ;)!!
Bedankt voor jullie leuke reacties, allemaal een fijne week gewenst!

On the pictures here above you can see a bit of result, because I’m not yet done with the hinges. I quickly put a vase with striped tulips on the oak chest and took a picture. Unfortunately it is a modern vase, but I had no time to lose for looking for another one: it was nearly too dark ;)!
Thank you all for your kind comments, I wish you all a nice week!

Ilona

donderdag 26 januari 2017

Beetje lente / Touch of spring


Ondanks dat het hier de afgelopen weken lekker gevroren heeft, steekt hier en daar al een kopje van een lentebloem boven hun dekentje van verdord bladeren uit.
Mijn sneeuwklokjes doen hun naam eer aan en staan al 2 weken in volle bloei, zo mooi :)!

Despite we have had frost in the recent weeks, here and there is appearing a small flower head of a spring flower above their blanket of withered leaves.
My snowdrops do justice to their name and they’re already in full bloom for two weeks, so beautiful :)! 


Op mijn werktafel was het ook een beetje lente, ik heb een flinke bos oranje/gele papegaaientulpen afgemaakt (ze zijn al verkocht). Hier boven zie je het begin van zo'n tulp, er zitten al drie losse bloemblaadjes aan, gestreept en gekerfd. Zoals ik al eerder zei: het is veel werk en erg tijdrovend, maar als je zo’n kleurige bos papegaaientulpen ziet, krijg je er direct een heerlijk lentegevoel bij, of niet ;)??


Even on my work table was a little spring, I finished a big bunch of orange/yellow parrot tulips (they're already sold). Here above you see the beginning of such a tulip, there are already three loose petals on the stem, striped and notched. Like I said before: it's a lot of work and very time consuming, but when you see such a colorful bunch parrot tulips, you immediately get a lovely feeling of spring, isn't it ;) ??


 Glazen bloemenvaas is gemaakt door Phil Grenyer, website: www.glasscraftuk.com
Glass flower vase is made by Phil Grenyer, his website is: www.glasscraftuk.com


Hier boven kun je de hele bos papegaaientulpen zien, ik word er altijd zo vrolijk van!
Dank voor jullie fijne reacties, een heel fijn weekend gewenst :).

Here above you can see the whole bunch of parrot tulips, it always makes me so cheerful!
Thank you for your nice comments, I wish you all a lovely weekend :).

Ilona

zondag 22 januari 2017

Keukenaanrecht / Kitchen sink


Het is voor mij absoluut noodzakelijk om tussen het maken van miniatuurbloemen door iets anders in miniatuur te kunnen doen. Miniatuur bloemen maken is zeer tijdrovend en zeer geconcentreerd werk, dus voor mij is afwisseling altijd zeer welkom ;).
Afgelopen week heb ik tijd gemaakt om een keukenaanrecht te maken van “granietklei”, die ik een poos geleden had gevonden in een hobbywinkel. Ik had er nog nooit van gehoord en besloot toen een blokje te kopen om het eens uit te proberen. Inmiddels was ik de klei alweer “vergeten” en ik vond het dus weer terug, toen ik op zoek was naar iets anders…..klinkt dat sommigen van jullie niet bekend in de oren ;O??

For me it’s absolutely necessary for doing something else in miniature, in between the making of miniature flowers. Making my miniature flowers is very timeconsuming and very concentrated work, so for me a bit of varity is always very welcome ;).
Last week I took the time for making a kitchen sink, out of “granite” clay, which I found awhile ago in a hobby shop. I’d never heard of this sort of clay and I decided to buy a small block to give it a try. In the meantime I was completely “forgotten” this clay and I found it back, when I was looking for something else……. I think this sounds familiar for some of you, isn’t it ;O??


De klei laat zich echter niet gemakkelijk bewerken, met name het kneden is wat ongemakkelijk, het materiaal is vrij taai en ruw. Maar wie een gratis peeling van de huid van je handen wilt: nou, probeer het maar eens ;O! Ik kwam erachter dat het voor mij het beste was om de kei te snijden met een groot keukenmes. Je moet dan echter wel meteen de goede maten afsnijden, of beter gezegd iets ruimer dan gepland, want ondanks dat er op de gebruiksaanwijzing staat dat de klei niet krimpt, deed het dat wél. Er waren dus twee pogingen nodig om een aanrecht voor mijn boerderijkeuken uit de jaren 50 te krijgen.

Editing the clay wasn’t that easy, in particular the kneading of the clay is a bit uncomfortable, because it's quite tough and rough material. But who wants a free peeling of the skin of your hands: well, you can always try it ;O! I noticed that for me it was best for cutting the clay with a large kitchen knife. Than you have to cut the clay in exactly the desired sizes, or better said just a little bit larger than planned, because despite of the instructions tell you that the clay doesn’t shrink, it did. So therefore I needed two attempts for getting a kitchen sink for my farm kitchen of the 50s.


Kijk, dit is het verschil, nog best veel, niet?
Look, this is the difference, still quite a lot, isn’t it?


Maar hoe zou ik nu een miniatuur gootsteen kunnen maken en dan zo eentje met van die hele kleine vierkantje steentjes? Een poosje geleden liet een vriendin mij een soort schilderijtje zien, wat was gemaakt van plastic “pixels” (meer informatie: http://www.pixelhobby.com/ ) De pixels zijn 2x2 mm.
Hierdoor kreeg ik een idee om die pixels voor mijn miniatuur gootsteentje te gebruiken. Ik had alleen wat moeite met de dikte van de pixels, want hiermee moest ik rekening houden bij het snijden van de granietklei.

But how could I make a kitchen sink in miniature and than that one with those tiny black and white square tiles?  A while ago a friend showed me a kind of painting, it was made with plastic “pixels”(more information: http://www.pixelhobby.com/ ) The size of the pixels is 2x2 mm.

Through this I got the idea for using these pixels for my miniature sink. I only had some difficulty with the thickness of the pixels, because I had to reckon with this, when cutting the granite clay.


De pixels worden op de bijbehorende plastic plaatjes met hele kleine pinnetjes bevestigd, het gemakkelijkst gaat dit met behulp van een pincet.

The pixels have to be attached on the corresponding plastic plates with very tiny pins, the easiest way to do this is by using a pair of tweezers.


Vóór dat je de pixels op de plaatjes bevestigd, moeten ze op maat gesneden worden met een hobbymes. Doe dit echter héél voorzichtig, want het plastic is erg taai, het breekt niet gemakkelijk, dus kun je je al snel in de vingers snijden. Ik wéét nu hoe dat voelt…. ;)!

Before you will attach the pixels on the plastic plates, they have to been cut to size with a sharp hobby knife. Be very careful doing this, because the plastic is quite solid: it won’t easily break, so you can easily cut in your fingers. I did, so I know how it feels…. ;)!


Je zult ook op een goede volgorde van de kleur van de tegeltjes moeten letten, zodat je op elke zijde afwisselend met zwart, of een witte pixel begint, anders krijg je niet het gewenste geruite patroon.

You will also need to pay attention for starting in the right order of the color of the tiles, so you start on each side alternately with a black, or a white pixel, otherwise you don't get the desired checkered pattern.


Zo ziet het gootsteentje er nu uit, er komt nog een messing afvoerputje in met gaatjes in het dekseltje. Hoe ik dát ga doen, moet ik nog uitvogelen ;).

This is how the sink looks now, it will get a brass drain with holes in the lid later. How I will do that, is something I have to figure out yet ;).


Afgelopen week heb ik deze papegaaientulpen gemaakt, zoals gezegd is het zeer tijdrovend werk: al die pietepeuterige streepjes en knipjes. Hieraan kun je zien dat ik af en toe écht even wat anders moet doen, zoiets als deze miniatuur gootsteen ;)!
Bedankt voor jullie fijne reacties, allemaal een fijne zondagavond en nieuwe week gewenst :D!

Last week I've made these parrot tulips, as I said it’s very time consuming work: all the tiny stripes and the tiniest cuts in the petals. So, now you can imagine why I had to do something else like this miniature kitchen sink ;)!
Thank you all for your kind comments, I wish you all a nice Sunday evening and new week :D!

Ilona

zaterdag 14 januari 2017

Eeuwige jeugd…? / Eternal youth…?


Volgens bronnen op internet staat bamboe symbool voor eeuwige jeugd. Zou eeuwige jeugd bestaan? Geen idee, maar na twee keer een complete verhuizing in een aantal weken tijd en alle karweitjes die daarbij komen kijken (dus was ik een beetje ziek door oververmoeid), heb ik nu écht niet het gevoel van een eeuwige jeugd, hihihi ;D!
 Dus veel tijd heb ik niet kunnen besteden aan miniaturen maken, vandaar dat ik mijn stoffige archief ingedoken ben om dit blog te schrijven en met resultaat: de zwarte bamboe had ik nog niet laten zien.

According sources on the internet is bamboo the symbol for eternal youth. Would eternal youth exist? I've no idea, but after being busy with twice a complete moving house in several weeks time and all of the chores, what has to do with it (so I've been a little sick of being overtired), I don't feel exactly an eternal youth now, hehehe ;D!

Thus I haven’t done much of making miniatures, so I’ve digged in my dusty archive to look for something to write this blog and this the result: I haven’t show you the black bamboo yet.


Vorig jaar vroeg Rika van Nellestijn, van het magazine DollsHouse Nederland, mij of ik, voor een van haar artikelen, misschien een bamboeplant zou kunnen maken. Deze bamboe zou als achtergrond dienen voor miniatuur panda’s, uit wol gevilt door Natasja Woord. Aanleiding was het nieuws dat er twee echte pandaberen naar Ouwehands Dierenpark te Rhenen zouden komen. Voor de komst van deze beren is een apart verblijf gebouwd, het Pandasia. En inmiddels is bekend geworden dat de panda’s iets later dan gepland naar Nederland komen: voorjaar 2017!
Zoals jullie weten vind ik uitdagingen in miniatuur leuk om te doen, heb ik het geprobeerd en het is gelukt! Hier zijn de foto’s en het betreffende artikel.

Last year Rika van Nellestijn, the editor of the magazine DollsHouse Nederland, asked me if I could make a bamboo plant for one of her articles fort he magazine. This bamboo would be used for the scenery for miniature panda bears, wool felted by Natasja Woord. The reason was the news that two real panda bears would come to Ouwehand Zoo in Rhenen. Before the advent of these bears there was built a special designed residence, PandAsia. And in the meantime we know that the panda bears will arrive a little later than planned to the Netherlands: in spring 2017!
As you know, I like challenges in making miniatures, so I've tried it and it worked! Here are the pictures and the article.


Voor de DHN-show van vorig jaar oktober, heb ik een nieuwe bamboeplant gemaakt, een zwarte deze keer. Hij stond in een pot gemaakt van een dop, maar die vond ik absoluut niet mooi. Het punt is dat er geen moderne bloempotten bestaan, althans IK kan er geen vinden! Inmiddels heb ik een pot gevonden die er veel beter bij staat en is de zwarte bamboeplant overgepot, zo da’s beter ;)!

For the DHN-show of last October, I made a new bamboo plant, a black one this time. It stood in a pot made of a cap, but I didn’t like at all. Point is that there are existing no modern flower pot, that is: I can’t find one! In the meantime I found a cap which suits bette rand the black bamboo is repotted, so that’s better ;)!


Honderden blaadjes heb ik geknipt voor deze plant en geloof het of niet: in wel 5 tinten groen. Maar het was het waard: het geeft de nodige diepte en echtheid aan deze bamboeplant, dus doe je dat gewoon ;O.

I’ve cut hundreds of small leaflets fort his plant and believe it, or not: in at least 5 shades of green. But it was worth it: it gives so much depth and authenticity tot his bamboo plant, so you just do it ;O.


Ik ga voor het maken van nieuwe soorten planten in miniatuur altijd even naar een tuincentrum in mijn buurt, om de planten in het echt te kunnen bestuderen en toen zag ik dat er wat dor blad in de potten tussen de bamboestengels lagen. Dus nadat de plant eenmaal zijn nieuwe pot had gekregen, heb ik er nog wat extra vergeeld, dor blad bijgemaakt.

For making new species of plants in miniature, I always visit a garden centre in my region, for studying the plants in real and it was then that I saw some yellow weathered leaves in the flower pots, lieing between the bamboo stalks. So after the miniature bamboo plant got its new pot, I’ve also made and added some extra weathered leaves.


De winter is momenteel heel even in Nederland, eindelijk! Zijnde een winterkind vind ik het heerlijk om alle moois van de winterse natuur te fotograferen ;)! 
Ik wens jullie allemaal nog een heel fijne weekend en ik hoop snel weer wat nieuws in mini te kunnen laten zien.

Winter is currently briefly in the Netherlands, finally! Being myself a winter child, I love to photograph all the beauty of wintery nature ;)!
I wish you all a very nice weekend and I hope to be back soon with something new in miniature.

Ilona

zaterdag 31 december 2016

Gelukkig Nieuwjaar / Happy New Year

Vlak voordat ik ging helpen met de verhuizing van een van mijn kinderen, lukte mij het nog net om iets in miniatuur te kunnen maken...


Just before I went to help with the house move of one of my children, I just managed to make something in miniature...


Miniatuur gevlochten mandje en Amaryllis bollen, beiden zijn door mij gemaakt.
Miniature wicker basket and Amaryllis flower bulbs, both are made by me.


Close up van Amaryllisbol, er zit een randje met "ijskristalletjes" om de bol, gemaakt met sneeuwglitter ;)!


Close-up of the Amaryllis flower bulb, there is a touch of "frost crystals" around the bulb, made with snow glitter ;)!


De inhoud is verwijderbaar, niets is vastgelijmd
The content can be removed, nothing is glued in


Het mandje is 2 cm in doorsnede, totale hoogte 4 cm
The basket is 2 cm in diameter, total height is 4 cm


De bodem van het gevlochten mandje is 'n houten hartje
The bottom side of the wicker basket is a heart shaped woodsie


Nu gauw verder met verhuizen en natuurlijk een beetje Oud en Nieuw vieren, helaas is er geen tijd voor facebook en van bloggen komt echt helemaal niets.
Dus, van tussen de verhuisdozen wens ik iedereen: Gelukkig Nieuwjaar!

Now we'll quickly move on with the help for the house move and of course, a little celebrating of the New Year, however, for me there's no time at all for Facebook and blogging.
From between the boxes of a house move I wish everyone: Happy New Year!

Ilona

vrijdag 23 december 2016


Vroeger ging men, met bijl en zaag, het bos in om zelf een kerstboom uit te zoeken en mee te nemen naar huis.

In earlier times they looked for a Christmas tree in the forest and using an ax and a saw, they took the tree home with them.


Thuis werd er een houten kruis aan de onderkant van de boomstam gespijkerd, zodat de boom niet omviel....

Back home there was nailed a wooden cross at the bottom side of the tree trunk, so the tree couldn’t fall over....


....zó, die staat!
....all right, that stands!


Deze miniatuur kerstboom heb ik zelf gemaakt van een takje en wat stukjes op maat gesneden natuurlijk mos van het merk Busch, zie foto.

This miniature Christmas tree is made by me, using a thin piece of branch and customized pieces of natural moss from the brand Busch, see picture.


Hier is het inspectieteam om te zien of die kerstboom wel stevig stond ;O
Here, you see the inspection team to see if the Christmas tree was standing sturdy enough ;O


De oude kerstballen zitten in ouderwetse kartonnen doosjes, ook zelfgemaakt van zeer dun karton, wat je kunt vinden in rollen inpakpapier. In vroeger tijden werden de glazen kerstballen in vloeipapier gedraaid, dit was om te voorkomen dat ze zouden breken. Hiervoor heb ik wit zijdepapier gebruikt.

The old Christmas baubles are stored in old fashioned cardboard boxes, I made the boxes of very thin cardboard. You can find it in rolls of wrapping paper. In earlier times people wrapped their glass Christmas baubles in tissue paper, in order to prevent break. I used white silk paper for this purpose.


Vroeger werden de kerstballen met ijzeren haakjes in de boom gehangen, ik heb ze in mini gemaakt van dun koperdraad.

In earlier times Christmas baubles were hung in the tree by using tiny iron hooks, I made these in miniature of thin copper wire.


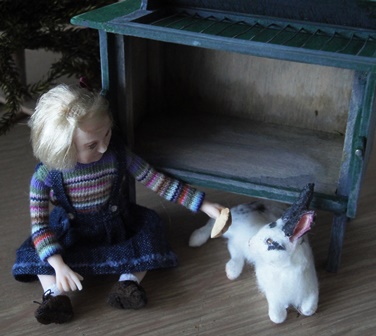
Kleine Ikke gaat haar konijn een korst brood voeren…….nee, dit is niet Flappie ;)!
Tegen de nachtvorst hangt er een stuk jute zak voor zijn hok.

Little me is going to feed her rabbit with a piece of dry bread.
Because of the night frost there is a piece of cloth at the front side of his hutch.


Ik heb ooit eens een houten konijnenhok gemaakt, maar dat vond ik nu niet mooi, veel te netjes.
Hup, een “oud”verflaagjes…of twee drie en ineens ziet het er veel beter uit.

I’ve ever made a wooden rabbit hutch, but I didn’t like it anymore, much too neat. Okay, one of two, three layers of “old” paint and the whole looks so much prettier.


En natuurlijk, horen er ook de nodige opgedroogde plasjes en keuteltjes in, dán ziet het er zó uit ;O!
And of course, there also belong alot of dried pee and droppings, then it looks like this ;O!


Konijn krijgt van Kleine Ikke eten en hij mag lekker even rondhuppelen.
Rabbit gets some food from Little Me and he can hopping around a bit.


Ik heb tussendoor nog wat tijd gevonden om minikerststerren te maken, alleen de potjes moeten nog witgeschilderd worden.

In the meantime I found a bit of time for making some miniature mini Poinsettias, I only have to paint the pots in white.


Tenslotte wil ik iedereen bedanken voor het lezen van mijn blog in het afgelopen jaar, of om mij zelfs een reactie te schrijven. Het kost mij altijd veel van mijn schaarse vrije tijd om een beetje leuke blog te schrijven, vooral in twee talen (althans ik doe mijn best in mijn armzalige Engels ;O). Ik zal de komende twee weken niet aanwezig zijn in de blogwereld, dus: allemaal hele fijne feestdagen en een heel goed 2017!

At last I want to thank everyone, who takes some time to read my blog in the past year, or even writes me a comment. It always takes alot of my scarce free time, for writing a bit of nice blog, moreover, in two languages (okay, I do my best in my poor Emglish ;O). These coming two weeks I’m not in the blog world, so I wish you all: a Merry Christmas and best wishes for 2017!

Ilona