my e-mailaddress


vrijdag 22 mei 2020

De klompen van Koos / The wooden shoes of Koos


In mijn vorige blog bericht zei ik dat ik zal laten zien hoe ik de klompen van Koos (en mini Opa) zelf gemaakt heb. Ik zal het proberen uit te leggen door foto’s te laten zien, helaas ben ik niet altijd in de gelegenheid om foto’s te maken tijdens het maken. 
Deels komt dat omdat ik op een gegeven moment spontaan aan iets in miniatuur begin, dus dan denk ik totaal niet aan fotograferen.
Eerst doe ik wat onderzoek (boeken en/of op internet), begin dan met iets te maken en komt er dan soms toch nog iets wat ik kan gebruiken, en dan heb ik er geen foto’s van gemaakt. Ik denk dat sommigen van jullie dat zullen herkennen…maar ik zal mijn best doen om het proces uit te leggen.

In my previous blog post I told you that I will show you how I've made the wooden shoes of Koos (and of my miniature Grandpa) myself. I'll try to explain it by showing pictures, unfortunately I'm not always able to take pictures while taking. 
This is partly because at some point I spontaneously start something in miniature, so I completely don't think of photographing. 
First I do some research (books and/or on internet), than I start making something and sometimes something appears what I can use, and than I often don't have pictures of it. I think that some of you will recognise this...but I'll do my best to explain the process.

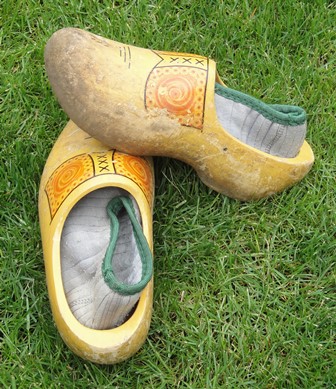

In Nederland worden klompen tot nu toe nog steeds gedragen, ik heb zelf al jarenlang klompen (zie deze foto’s) in gebruik als ik in mijn tuin werk, maar niét als ik uit ga, hoor ;).

Here, in The Netherlands, wooden shoes are still worn until nowadays, not as common footwear, but occasionally at work, by farmers and like I do for working in my garden. 
Since many years I use wooden shoes (see these pictures) when I’m working in my garden, but NOT when I’m going out, hehe ;).


Op mijn rechter klomp (links op de foto)  kun je zien dat het hout op de onderkant behoorlijk versleten is, dat komt omdat ik mijn rechtervoet gebruik tijdens het graven en kracht zetten.

On the bottom side of my right foot wooden shoe (the left one on the picture) you can see that the wood is quite worn out, that’s because I often use my rightfoot for digging.


Op deze foto, gevonden op het internet, zie je de verschillende fases tijdens het maken van échte klompen, zie hun website: https://klompenmuseum.nl/en/node/28902
En hieronder zie je hoe ik mijn miniatuur klompen maak.

On this picture, found on the internet, you see the different stages in making real life wooden shoes, see their website: https://klompenmuseum.nl/en/node/28902 (also in English!).
And here below you can see how I make my miniature wooden shoes.


Hierboven zie je de vormen die je uit de lindehouten lat moet zagen om ruw gevormde klompen te krijgen.
Here above you see the shapes you have to saw out of the basswood lath for getting roughly shaped wooden shoes.

(restant van de lindenhouten lat van 15 x 15 mm, na uitzagen van beide klompvormen)
(leftover of the basswood lath of 15 x 15 mm, after sawing the both shapes of the wooden shoe)

Oké, terug naar de miniatuur klompen van Koos, hier een (naar ik hoop duidelijke) beetje uitleg. Deze zijn op maat gemaakt voor zijn voeten, dat houdt in dat ik eerst voeten heb gemaakt van polymeerklei. Ik plak rondom een lindehouten lat (van 15 x 15 mm) een stukje schilderstape, waarop ik een klompvorm schets. 
Bovenop een schets van de klompvorm vanaf boven gezien, en aan één zijkant (en op exact dezelfde plaats op de lat) de klompvorm van opzij gezien. 
Daarna zaag ik met een figuurzaag éérst de vorm uit die de klompvorm van boven laat zien, waardoor ik een rechter- en een linker klomp krijg, anders krijgt Koosje last van zijn voeten natuurlijk. 
Daarna plak ik de uitgezaagde klompvorm in het hout opnieuw vast met schilderstape, waarbij ik de getekende vorm opzij vrij laat, anders kun je natuurlijk niet zien wat er als volgt uitgezaagd moet worden ;).

Okay, back to the miniature wooden shoes of Koos, here's a (I hope clear) bit of explanation.
These are made to fit just for his feet, which means that I firstly have made feet from polymer clay. Before I start I stick a piece of masking tape around a basswood lath (15 x 15 mm), on which I than draw with pencil the shape of a wooden shoe. On top of the lath I draw the clog shape seen from above, and on one side (and in exactly the same place on the lath) the clog shape seen from aside. 
Then I first saw out the shape with the  fret saw that shows the clog shape seen from above, so that I'll get a right footed and a left footed clog, otherwise Koosje will get pain at his feet. 
Then I put back again the sawn clog shape in the wood, than I taped off again the lath with painter's tape, but leaving the drawn wooden shoe shape on the side open, otherwise you can't see what needs to be sawn out as follows, of course ;).


(deze 'boortjes' hebben een diameter van 2 en 1 mm, en zijn prima geschikt voor het fijnere werk)
(these tiny 'drills' have a diameter of 2 and 1 mm, and are well suited for the finer work)

Nu heb ik een ruwe vorm van een linker- of rechter klomp, waarna ik start met het uithollen van de klompjes. Hiervoor gebruik ik speciaal gereedschap dat ik van mijn tandarts krijg. Het is al afgekeurd gereedschap, dus niet al te scherp meer, maar ik kan er nog steeds mijn mini klompjes mee uit hollen. Dit is een zeer tijdrovend werkje, want ik doe uren over het uithollen van één klompje. Het lijkt net of het hout dichter van samenstelling wordt, naarmate ik verder in de kern van het lindenhout kom…
Het is ook slecht voor mijn gewrichten dus doe ik het liever niet, maar soms komt er een speciale pop langs die erom vraagt ;).

Now I have a first, rough shape of a left footed, or a right footed wooden shoe, after which I start hollowing out the wooden shoes. For this I use special tools that I've got from my dentist. It is already rejected tools, so not quite sharp anymore, but I can still hollow out my mini wooden shoes with it. This is a very time consuming task, because I spend hours hollowing out one wooden shoe. It seems as if the wood gets denser in composition as I get further into the core of the basswood…
It is also bad for my joints so I prefer not to do it, but sometimes a special doll comes along and asks for it ;).


Nadat de klompen zijn uitgehold, moeten ze nog geschuurd worden met zeer fijn schuurpapier. Ook nu moet je weer heel goed opletten dat je niet te veel hout ineens weg schuurt, want dan zit je er zó doorheen (de wanden van de klompen meten bijna 1 mm dik) en kun je helemaal opnieuw beginnen is (helaas) mijn eigen ervaring.
De klompen van Koos moeten nog verweerd worden gemaakt, maar dat komt nog wel.

After I’ve hollowed out the wooden shoes, they have to be sanded with very fine sanding paper. Again you’ve to be very careful now and to take much care that you are not to sand away too much of the wood, because before you know it you will go through it (all sides of the wooden clogs are nearly 1 mm thick) and than you can start all the way from the first start is (unfortunately) my own experience.
The wooden shoes of Koos still have to be weathered, but that’s on my still to do list.


Omdat de polymeerklei voeten van Koos precies goed in verhouding waren met zijn lichaam, zou dat betekenen dat hij extreem grote klompen aan zijn voeten zou krijgen, dus totaal NIET verhouding! Koos zijn 'klei' voeten zijn niet plooibaar, dus daardoor kan hij nooit in de klompen stappen, dus heb ik helaas een stukje van 2 mm af moeten snijden (zijnde zijn tenen)…..

Because the polymer clay feet of Koos were exact right in proportion, it would mean that he would get extremely bigger wooden shoes at his feet, so totally NOT in proportion!
Koos his 'clay' feet aren’t pliable and because therefore he never would fluidly step into his clogs, so I unfortunately had to cut off a small piece of 2 mm (being his toes)…..


En zoals Birgit al vermoedde, heeft Koos zwarte, dikke wollen kniekousen aan zijn voeten gekregen, zoals gewoon was in de jaren ‘50. Kijk maar!
(voor de sokken heb ik zwarte tricotstof van een oud, dun t-shirt gebruikt)
Dank voor jullie fijne reacties, ik wens jullie een fijn weekeinde!

And as Birgit already did guess, Koos got black, thick woolen socks at his feet, until his knees as was common in the 50s. Look here!
(I used black tricot fabric of an old, thin t-shirt for the socks)
Thank you for your kind comments, have a nice weekend!

Ilona

vrijdag 15 mei 2020

Ontspannen kerel… / Relaxed guy


Ondanks dat hij zo ontzettend verlegen is, heeft Koos zijn gezicht al veel eerder laten zien hier op mijn blog. Hij was in 2012 te zien maar in een andere gedaante, Hendrik Jan genaamd. Voor diegenen die geïnteresseerd zijn, hier is de link: https://minimumloon.blogspot.com/2012/05/vandaag-was-het-zonnig-en-hondenweer.html
Op bovenstaande foto lijkt Koos net op een arrestant: handen tegen de muur, benen iets gespreid om hem te fouilleren, maar Koos is de goedheid zelve....

Despite of the fact that he is very shy, Koos has shown his face already much earlier here on my blog. He appeared in 2012, but than as an other person, named Henry John. For those who are interested, here is the link:
In the photo above, Koos looks like an arrested person: hands against the wall, legs spread slightly to search this suspect, but Koos is the goodness himself....


....en altijd hulpvaardig ;)!
....and always offering a helping hand ;)!


Nadat ik zijn gezicht heb bewerkt, ben ik zijn nieuwe lijf (gemaakt van Fimo klei) gaan aankleden, want als je zó verlegen bent als Koos, dan wil je niets liever dan gauw wat kleren aan je lijf, toch ;O)?
Eerst maar een broek en overhemd gemaakt voor Koos, en zijn voormalige muts op zijn kale koppie gezet.
Zoals veel mensen in die moeilijke naoorlogse jaren ’40 en ’50 werkt Koos heel erg hard voor zijn bestaan. Hij helpt de boeren als seizoenarbeider met allerlei zware klussen op het land, of de boerderij. Hij heeft grote eeltige handen en loopt wat scheef, dat komt omdat hij last van zijn rug heeft na jaren van zware lichamelijke arbeid, dit kun je zien aan de foto's, die van opzij zijn genomen.

After I’ve edited his face, I’ve dressed his new body (made of Fimo clay), because if you are so very shy as Koos is, you rather prefer to be dressed as soon as possible, huh ;O)?
Firstly I've made for Koos a pair of trousers and a shirt, and I put him his former bonnet on his bald head.
Like many people in those difficult years after WWII, in the 40s and 50s, Koos works very hard for earning a living. Working a seasonal worker, Koos helps the farmers with all kinds of tough jobs on the fields, or the farm. He has large, callous hands and walks a bit crooked, that's because he has problems with his back spine after years of heavy physical work, you can see this on the photo's, taken from aside.


Hierna was de spencer uit de jaren ’50 aan de beurt. Die is genaaid van een soort fijne tricot stof, die gelukkig wat mee kan rekken, zie hierboven waarom…

After that the spencer from the 50s was on turn. It’s sewn out of fine tricot fabric, which can luckily stretch a bit, see on the picture above why…


Ik werk het liefst met natuurlijke stoffen, zoals zeer dunne katoen en echte zijde, want die stoffen kun je vorm geven, als je ze iets verwarmd met je handen, kijk zo. Wil je kreukels in de stof dan kun je de stof ter plaatse verwarmen en met je warme vingers vormen of erin knijpen, zoals “knieën, of ellebogen” maken in een broek, of overhemd.
Voor Koos ben ik begonnen met het naaien van de lange naden in de katoen, maar de zomen onderin en de mouwen heb ik gelijmd met Tacky Glue. Als de lijm nog niet compleet droog is, kun je die gelijmde delen (de zomen) nog een beetje vormen naar het lichaam. Je moet dan natuurlijk al wel van tevoren weten hoe je pop eruit moet komen te zien ;).

I prefer to work with natural fabrics, such as very thin cotton and real silk, because you can shape those fabrics, if you heat them slightly with your hands, see here. If you want creases in the fabric, you can warm the fabric on the wanted spot and shape or squeeze them with your warm fingers, such as making “knees, or elbows” in trousers or a shirt.
For Koos I started sewing the long seams in the cotton, but I glued the hems at the bottom of the parts with Tacky Glue. If the glue is not yet completely dry, you can still shape that glue slightly to the body. Of course you have to know in advance what your doll should look like ;).


Om alle kleding op zijn gebogen lijf “in vorm te krijgen”, liet ik Koos een zogenaamde "fitness crunch" doen. Na het maken van deze foto moest ik hier namelijk aan denken en heb ik bij mijn kinderen nagevraagd hoe deze oefening heette: geen push up, maar een………? Het antwoord was dus een fitness crunch, hihihi, weer wat geleerd!
Ik had geen idee, hoe dat heette, maar ik ken wèl crunchy stukjes in mijn muesli ;).

For “getting in shape” all of the clothing on his bent body, I let Koos doing a so called "fitness crunch". After taking this picture I namely had to think of this, and I’ve asked my children how this particular fitness excercise was named: not a push up, but a…….? The answer was a fitness crunch, hehehe, I've learned something new!
I had no clue how it was called, but I do know crunchy parts in my muesli ;).


Zó, dat ziet er beter uit!
This looks much better!


Nu was het tijd voor een kapsel uit de jaren ’50, want Koos was in die tijd een buurman (een zogenaamde "noaber" genoemd, zoals nog steeds hier in de streek) van mijn mini grootouders (Huibrecht had het goed geraden ;O)).
In eerste instantie zag Koos er zo uit, maar ik vond het toch iets te veel oranje. Vandaar mijn keuze voor rode krullen, al was het bij Koos nog maar een randje (als je goed kijkt kun je zijn kale hoofd zien, net onder de rand van zijn pet ;O) ). Koos is inmiddels aardig op leeftijd, maar hij is nog steeds trots op zijn rode haar.

It now was time for a hairdo of the 50s, because in that time Koos was a neighbour (a so called "noaber" in Dutch regional dialect) of my mini grandparents (Huibrecht guessed it right ;O)).
At first Koos looked like this, but I thought it was too much of orange. Therefore my choice of red curls, allthough it was just a narrow edge of hair (if you look well, you can see his bald head, just underneath the rim of his cap ;O)  ). Koos is at age by now, but he is still very proud of his red hair.


Terwijl Koos zijn haren geknipt werden, zat hij zenuwachtig aan zijn pet te friemelen, want hij zit niet graag zonder zijn pet.

While Koos had his hair cut, he was nervously fidgeting at his cap, because he doesn't like to be without his cap. 


Zo gauw Oma klaar was met zijn haren te knippen, ging de pet direct weer op zijn hoofd, want dan leek het of hij nog al zijn haar had ;).

As soon as Grandma was done with cutting his hair, his cap went back on his head instantly, because it than seemed as if he still had all his hair ;).


Koos is nu nog blootsvoets maar ik ben al bezig om voor hem een paar nieuwe klompen te maken.
Hoe ik de klompen maak, laat ik de volgende keer zien.
Dank voor jullie fijne reacties, ik wens jullie een fijn weekeinde!

Koos is still barefoot but I am already making a pair of new wooden clogs for him.
I'll show you how I make the wooden clogs next time.    
Thank you for your kind comments, I wish you all a nice weekend!

Ilona

zondag 10 mei 2020

Bloempotkapsel / Flowerpot hairdo


In de jaren ’50 was het niet ongewoon dat je eigen moeder je haren knipte als het te lang was geworden. Het verhaal gaat (maar ik heb het nooit in het echt gezien, hoor) dat er dan een bloempot op je hoofd werd gezet waarna het stuk haar dat er onder uit piepte, afgeknipt werd!
Ik had in die tijd vriendinnetjes, die na zo’n knipbeurt thuis, gedaan door hun eigen moeder, zó op school verschenen. Wij voelden ons dan bevoorrecht omdat wij vroeger altijd wel gewoon naar de dorpskapper mochten en daarvan terug kwamen met een goed geknipt kaspel ;).

In the 50s it was not uncommon that your own mother was cutting your hair when it was grown too long. The story goes (but I haven’t ever seen this happening in real life) that there was placed a flowerpot on your head, where after the long hair that peeped out from underneath the flowerpot, was cut off!
In that time I also had girlfriends, who came to school after a good haircut session this way at home, done by their own Moms. We always feeled priviliged because we always went to the local village hairdresser and came home with a well cut hairdo ;).


Waarom dit verhaal over de kapper in de jaren ’50? Nou, dat komt omdat ik in een doosje een oud mannetje terugvond dat ik een paar jaar geleden van Fimoklei heb gemaakt. Zijn lijf was ‘versleten’ en dat was de aanleiding om hem een nieuw lijf te geven. Zijn hoofd echter zag er ‘nog aardig’ uit, maar ik was niet tevreden over zijn gelaatskleur. Het hoofd was bewerkt met toneel make-up en zag er te kunstmatig uit. Na een flinke poetsbeurt met nagellak remover (zonder aceton!) zag hij er al wat beter uit. Nu was er nog het probleem dat zijn ogen gesloten waren, dat was toentertijd bewust zo gedaan, want hij moest een slapende pop voorstellen. Ik heb er nu maar een heel verlegen mannetje van gemaakt, zelfs zó verlegen dat hij altijd naar beneden kijkt. 
Hij kreeg de naam Jacob, maar wordt kortweg Koos genoemd.

Why this story about the hair dresser in the 50s? Well, that’s because  I’ve re-found in a box an old little man, who I’ve made of Fimo clay for a few years ago. His body was ‘worn out’and that was reason for me to give him a new body. However his head still looked ‘nice’, but I was not content with the color of his face. The head was edited with professional theatre make up and looked far too artificial. After a good rub with nail polish remover (without acetone!) he looked way better. Now there was still one problem left: his closed eyes, because at the time I created him, he was supposed to be a sleeping doll. I now have made of him a very shy doll, even so shy that he always has his eyes down. 
He got the name Jacob, shortened to Koos (phonetically pronounced as the word ‘chose’, but than instead of ‘ch’ its started with a ‘K’).


Koos is altijd heel ontspannen, hij heeft altijd een sigarenstompje in zijn mondhoek hangen, gemaakt van bloemendraad met een puntje grijs/wit/zwarte verf ;)

Koos is always very relaxed, he always has a non-burning cigar stump in the corner of his mouth (made of floral wire with a tip of gray/white/black paint ;) 


Omdat Koos kaal was, heb ik hem een soort kapsel. 
Mijn miniatuur Oma heeft hem weer daarna een flinke knipbeurt uit de jaren ’50’ gegeven, vandaar mijn verhaal over de kapper in die tijd ;O).

Since Koos was bald, I gave him a certain hairdo. 
After that my miniature grandma gave him a good haircut as was common in the 50s, hence my story about the hairdresser at the time ;O).


Omdat het vandaag Moederdag is hier, heb ik te weinig tijd gehad om een blogpost te schrijven, dus binnen een paar dagen laat ik meer van Koos zien.
Ik heb een hele fijne Moederdag gehad (online bestelde kadootjes gekregen ;O) ), en ik hoop écht dat dat voor meer moeders het geval zal zijn geweest, gezien de pandemie. Deze trieste situatie is zoals het is en we moeten er zelf maar wat van moeten maken, toch?
Blijf gezond en zorg goed voor elkaar en jezelf. 
Dank voor jullie fijne reacties, een fijne avond en nieuwe week toegewenst!

Because today it’s Mother’s Day, I’ve had too less time for writing a proper blog post, so within a few days I’ll show you more of Koos.
I’ve had a nice Mother’s Day (I got online ordered gifts ;O) ), and I truly hope that more mothers can say this, seen this pandemic. This sad situation is as it is and we all have to make the best out of it, isn't it?
Stay healthy and take care for others and yourself.
Thank you for your nice comments, I wish you a nice evening and a new week ahead!

Ilona

zaterdag 2 mei 2020

Beige, groen, donker indigo blauw en wit / Beige, green, dark indigo blue and white


Van Koningsdag, op 27 april, is het een klein stapje terug naar onze voormalige Koninginnedag, dat was op 30 april. Onze voormalige Koningin, Beatrix, werd altijd in het openbaar gezien met een hoed op haar hoofd. Na het maken van de witte hoed (zie een vorig blog bericht) heb ik nog een paar pogingen gedaan om hoeden te maken.

After celebrating King’s Day, on 27th of April (this year without common festivities due to the pandemic), it’s one small step back in time to our former Queen’s Day, on 30th of April. Our former Queen, Beatrix, was always seen in public with a hat on her head. After I made the white hat (see one of my previous blog posts) I’ve done some more attempts for making hats.


Sorry, voor de slechte kwaliteit licht op de foto's, de zon scheen hier nogal fel, maar op de eerste twee foto is de juiste zacht beige kleur weergegeven.

Sorry, for the poor quality of light on the pictures, the sun was shining brightly here, but on the first two pictures you see the right color of soft beige.


Ik vond het erg leuk om jullie reacties op mijn vorige blog bericht over de witte hoed te lezen:
 De reactie van Sheila was een praktische: karton onder de hoed, zodat de stof met lijm/watermengsel niet (zo strak) om de bol van de mal vast komt te zitten. Maar ik wilde juist een transparante hoed zo als dat nu na het verstevigen van de stof goed te zien is. Karton, of papier zou de hoed ondoorzichtig maken. Maar dankjewel voor het meedenken en je goede tip, Sheila, het is er eentje om te onthouden.

I loved reading all of your comments on my previous blog post, the one about the white hat:
The comment of Sheila was a practical one: by putting carton/paper under the fabric, the crown and brim wouldn’t get stuck to the mold. But I particularly wanted a tranparent hat, as you can see now very well, after strengthening the fabric with the diluted glue mixture. Carton, or paper would make the hat opaque. But thank you so much for thinking with me and your good tip/advice, Sheila, it's one to remember.


Sherrill had het over een teruggeslagen rand van de hoed. Ik heb dat eens uitgeprobeerd, maar de rand was niet vast te zetten op de bovenkant van de hoed (er zaten enige millimeters verschil tussen bol en rand). Ik heb nog steeds geen idee hoe dat kan, maar het was zo. Het enige wat me dat opleverde was een bol van de hoed, die ik aangepast heb naar een hoedje zonder rand, zie hierboven de donker indigo blauwe hoed met échte veren (op maat geknipt).

Sherrill thought that a hat with a flipped up brim would be nice. I’ve tried to make one, but after flipping up the brim it was not fitting into the crown of the hat. Because there was too much space (of several millimeters) between crown and trim. I have no clue how comes, but it was. The only thing it left me was a perfect crown of this failed hat, so I’ve converted it into a small hat without trim, see  here above on the pictures, the dark indigo blue hat with real feathers (cut to fit).


Hier is de hoed klaar voor decoratie, ik wil hier het strikje laten zien dat gemaakt is van 7 mm breed zijde lint, waarvan ik de middelste draden zijde heb uitgetrokken. Het gebeurde per ongeluk, maar het effect was een 'weelderige', luchtige open strik, wat mooi paste bij de transparantie van de hoed.

Here you see the hat ready for decoration, here I want to show you the bow that's made of silk ribbon, 7 mm wide, ofwhich I pulled out the threads of silk in the middle. It happened by accident, but the effect was a 'lush', airy open bow, that fitted wonderfully to the transparency of the hat.


Op deze foto kun je goed zien dat de hoed enigszins transparant is, wat een zachte glans geeft aan het gezicht. Deze etalagepop bestaat uit een half lijfje met een heel smal gezichtje, dat ik jaren geleden op een beurs heb gekocht. Het popje is kleiner dan een 1:12 pop zou moeten zijn, daarom is de hoed wijder zodat er ook nog kapsels onder kunnen en de hoed mooi aansluit.

On this picture you can see well that the hat is somewhat transparent, which gives a soft shine to the face. This mannequin consists of a half body with a narrow face, which I bought at a fair years ago. This doll is smaller than a 1:12 doll should be, therefore the hat is wider so that there's room for haircuts and the hat still fits nicely.


Hier zie je dat de decoratie geribbeld is, dat was ook mijn bedoeling ;)!
Here you see that the decoration is ribbed, that was also my intention ;)!


Ook de opmerking van Drora was een leuke: Queen Elizabeth van Engeland draagt ook altijd een hoed, vandaar mijn knipoog in dit bericht naar onze voormalige Koningin, Beatrix.
En Birgit denkt dat deze witte hoed niet geschikt is voor Koningin Elizabeth, daarom heb ik nu gekleurde hoeden gemaakt, maar helaas voor Birgit, niet in felle kleuren ;O).

The comment of Drora was also nice: Queen Elizabeth of England is always wearing a hat, therefore my wink of an eye in this post to our former Queen, Beatrix.
And Birgit thinks that this white hat is not suitable for Queen Elizabeth, that’s why I now made some colored hats, but unfortunately for Birgit, not in bright colors ;O).


Kom ik bij de laatste opmerking, van Huibrecht, dat is écht iets voor een man: na het zien van de eerste foto denkt hij in eerste instantie dat ik twee kazen heb gemaakt (geintje natuurlijk). Ik heb er echt om moeten lachen, want je hebt helemaal gelijk, ik had helemaal nog niet gezien dat de mal wel iets van twee op elkaar gestapelde kazen heeft ;O)!!

Now to the last comment, of Huibrecht, that's really something for a man: he thinks I've made two cheeses (he's just kidding, of course). I really had a good laugh about it, because you were absolutely right, I haven’t seen before that this hat mold did look like two cheeses stacked on top of each other ;O) !!


Nou, ik heb met veel plezier deze paar miniatuur hoeden gemaakt, maar na vier exemplaren vind ik het even welletjes, want ik houd van wat variatie in mijn miniatuur werk. Er lag nog iets op mijn werktafel, waarmee ik ook plezier heb gehad: deze bloempot. En nee, het is niet gebruikt voor een miniatuur plant….dus, voor wat dan wel…???
Blijf veilig/gezond, zorg goed voor anderen en jezelf!

Well, I’ve had a lot of fun making these miniature hats, but after these four ones I stop making them, because I love some variation in my miniature work. There was also something else on my worktable, for having fun with: this flower pot. And no, it’s not used for a miniature plant…..so, can you guess for what I've used it…???
Stay healthy and safe, take care for others and yourself!

Ilona