my e-mailaddress


Posts tonen met het label 1:12 miniatuur ligusterhaag / 1:12 miniature privet hedge. Alle posts tonen

donderdag 11 juni 2020

Het duurde langer dan ik dacht….die heg! / It took much more time than I thought…..that privet hedge!

Vandaag ben ik 'gedwongen' om de nieuwe versie van Blogger te moeten gebruiken, omdat ik mijn foto's niet meer kan uploaden in de oude versie.
Maar kijk hier: het ziet er niet uit, bovendien véél te weinig mogelijkheden!!
Dus, mijn excuses als de lay out nergens op lijkt, niet mijn schuld ;O)!!

Today I've been 'forced' to use the new layout of Blogger, since I can't upload my pictures in the old version anymore.
But see here: it's NOT of my liking, it has way too less possibilities!!
So, I am sorry, if the lay out is not of your liking, it's NOT my fault ;O)!!

(foto van internet / photo of the internet)

In mijn vroege jeugdjaren, in de jaren ’60, was het heel gewoon dat je als kind thuis klusjes moest doen, die dingen moesten nu eenmaal gedaan worden. Je moeder was erg druk met haar grote gezin, dus moest oud en jong meehelpen door het doen van allerlei karweitjes in en rond huis. Karweitjes als aardappelen schillen, afwassen, schoenen van het hele gezin poetsen, de koperen voordeurbel poetsen en tal van andere dingen werden onder de kinderen naar leeftijd verdeeld. Op een gegeven moment, als de oudsten uit huis waren, werd het mijn taak om de 22 meter lange ligusterhaag te knippen, met de handschaar dan wel te verstaan hè!! Dus nu ik een ligusterhaag in miniatuur ging maken, kun je dus wel stellen dat ik, na jaren deze haag geknipt te hebben, heel goed wist hoe zo’n haag er uit ziet ;O)!! Op bovenstaande foto zie je hoe een gezonde ligusterhaag er (tegenwoordig) uitziet….

 In my early childhood, in the '60s, for children it was very common to do chores at home, those things just had to be done. Your mother was very busy with her large family, so the children had to help her by doing all kinds of chores in and around the house. Chores like peeling potatoes, washing the dishes, polishing the shoes of the whole family, polishing the brass front doorbell and letterbox and many other chores, you name it, were divided among us children by age. At some point, when the elder children had left house, it became my job for cutting the 22 meter long privet hedge, that’s to say: by hand scissors!! So now that I was going to make a privet hedge in miniature, you can say that after years of cutting this hedge in my childhood, I know very well how such a hedge looked looks like ;O)!! At the above picture you see how a healthy privet hedge (nowadays) looks….

(foto van internet / photo of the internet)

….en dit is hoe oude ligusterhagen eruit zien en ook hoe die van mijn grootouders er uit zagen. In mijn vorige blog bericht kon je lezen hoe ik het netwerk van takken voor zo’n oude ligusterhaag heb gemaakt, nu ga ik laten zien hoe ik het blad in miniatuur ervan heb gemaakt. En vóórdat je dat denkt: NEE, ik heb ze niet per stuk met de hand uitgeknipt ;O)!!

….and this how old privet hedges look and also how the ones of my grandparents did look like.  In my previous blog post you could read how I made the base of branches of such an old privet hedge, now I’ll show you how I made the leaves in miniature. And before you think I did: NO, I didn’t cut them by hand and per piece ;O)!!


Het bleek nog niet zo eenvoudig om bruikbaar materiaal voor dit karwei te vinden. Omdat het knippen van duizenden en duizenden blaadjes voor vele centimeters ligusterhaag in mini, natuurlijk gekkenwerk is, besloot ik om ander materiaal te gebruiken. Ik had voor dit doel bij Omgardens Miniaturen een paar zakjes zeer fijn materiaal gekocht (zie bovenstaande foto's), maar het was te kort en het zag er niet uit dus kon ik het niet gebruiken. Wat nu?

 It seemed that it wasn’t that simple to find suitable material for this job. Because cutting thousends and thousends of leaflets for lots of centimeters long sized privet hedge in miniature, of course is pure madness, I decided to use other material. For this purpose I purchased a few bags of very fine material of Omgardens Miniatures (see the above pictures), but it was too short and didn’t look very well so it was not usable for this purpose. What to do next?


Gravend in mijn opslagdozen, met gekochte spulletjes van jaren geleden, kwam ik dit plastic fris uitziende groene plantje tegen, zou dat gebruikt kunnen worden…?

 Digging in my storage boxes, with stuff I bought years ago, I came across this plastic fresh looking green plant, can that be possibly used….?

Eerst heb ik de losse onderdelen ontward, waarbij al direct bleek dat de plastic blaadjes en takjes erg veel kleine bochtjes hadden. Tijdens het lijmen en plaatsen, haakte daardoor het materiaal steeds in elkaar, wat mijnerzijds nogal wat ergernis opleverde…maar uiteindelijk is het gelukt.

 First I untangled the loose parts, which immediately showed that the plastic leaves and twigs had a lot of tiny curves. During gluing and placing, the material constantly hooked in each other, which on my part caused quite a bit of annoyance ... but finally it worked.


Tijdens het vastlijmen op de uiteinde van de groene plastic blaadjes op de takjes van de MDF basis, bleek dat de groene blaadjes veel nuances in de groene kleur had. Maar ik wist dat de beige/lichtbruine kleur van de takken in een echte heg hier en daar door het groen heen moest schemeren. De blaadjes waren dan wel van plastic maar ik wilde dit effect toch in mijn mini haag krijgen. Daarom bedacht ik bij het open snijden van de rondjes in het centrum van elk bosje met blaadjes, om dat centrum dan beige/lichtbruin te schilderen met acrylverf en op die manier meer diepte in de heg te creëren.

 During the process of gluing the plastic leaves to the branches of the MDF base, it appeared that the green leaves had a few shades in the green color. But out of experience I knew that the pale beige/brown color of the branches in a real life hedge, should show up here and there. The tiny leaves were made of plastic but I wanted this 'visible branche' effect also in my miniature hedge. While cutting open the round shapes of leaves in the centre, I therefore thought to paint that same centre with beige/light brown colored acrylic paint and on that way creating more depth in the hedge.

Ik zei al dat die kronkelende plastic takjes steeds in elkaar grepen bij het minste geringste aan beweging, hierboven kun je zien wat een tijdrovend werkje was om al die takjes uit elkaar te houden met de vingers van een hand om dan vervolgens met de andere hand je penseel met verf te gebruiken……..aaarrrgghh, maar ’t is gelukt na uren geduldig werken.

 I already told you that those curvy tiny branches were constantly tangled in each other by the minimum of movement. Here above you can see what a timeconsuming job it was for untangle all of these tiny branches with the fingers of one hand, and than at the same time using your other hand for painting the centre of it………aaaarrrgghh, but I succeeded after many hours of working patiently.


Één kant van de heg klaar, nu de andere kant…
One side of the hedge is done, now the other side…

De plastic blaadjes heb ik gelijmd met UHU lijm speciaal voor kunststoffen, niet ideaal, want als de blaadjes door draaien van het werkstuk in elkaar haakten, dan kwamen er vaak weer blaadjes los. Na lang drogen bleef het redelijk zitten, maar om dit soort dingen op te bergen zodat het niet los laat….pffff.

 The plastic leaves are glued on the branches by using UHU glue especially for plastics, not ideal, because the leaves immediately tangled in each other by turning the work piece, and if you wanted them to untangle than the glued leaves often came loose again of the branches. After a long time of drying the leaves were reasonably stuck, but for storing these sort of things so that things won’t get unlose again…..phew.


Omdat de heg bij mijn grootouders op droge zandgrond stond, wilde ik ook een lichte zandkleur onder de heg. Hiervoor heb ik de acrylverf gebruikt (zie mijn vorige blog bericht), maar hier en daar moest (om een bepaalde reden) de grond onder de heg ook nat zijn, dus werd er een tweede donkerder ‘zand’-laag opgebracht van hetzelfde soort medium.

 Because the hedge of my grandparents stood on dry sandy soil, I also wanted a light sandy color under the hedge. Herefor I used the same acrylic paint medium (see my previous blog post), but for some reason here and there the soil had to look wet too, so I used for the darker layer of ‘sand’ the same medium in a darker shade.


Ik heb voor deze foto een paar vellen met bakstenen in 1:12 gebruikt en mijn keukendeur er tegen aan gezet, want er is nog niets klaar van deze kant van de boerderij ;).

For taking this photo I used a few sheets of brickwork in 1:12 and put my kitchen door against it, because nothing is ready from this side of the farm yet ;).


Nou, mijn ligusterheggetjes in miniatuur staan er lekker frisgroen bij, iets wat niet gezegd kan worden van alle groene (meer triest geelgroene) gebieden in mijn streek, hier in het oosten van Nederland. Er is hier een ernstig tekort aan grondwater en voor komend weekend staat er weer erg warm weer met hoge temperaturen op het menu…..en in combinatie met mijn ernstige hooikoorts belooft dat niets goeds :(. 
Dank voor jullie fijne reacties, allemaal een goed weekeinde toegewenst!

 Well, my privet hedges in miniature look nicely fresh green, something that can not be said of all the green (sadly more yellowish green) areas in my region here, in the east of the Netherlands. There is a serious shortage of groundwater here and for next weekend is again warm weather with high temperatures on the menu…..and in combination with my severe hayfever it doesn't promise much good :(.  

Thank you for your kind comments, have a good weekend!

 Ilona

zaterdag 6 juni 2020

Terug naar ‘school’ / Back to ‘school’

De kinderen van de basisschool gingen de afgelopen week weer terug naar school, iets wat mij ertoe heeft aangezet om ook weer de ‘studieboeken’ op te nemen en te zien op welke manier ik verder kon gaan met de bouw van mijn miniatuur boerderij (van mijn grootouders).

This past week the kids  here, in The Netherlands, went back again to (primary) school. It was for me the time of getting back 'to school' too and taking my ‘study books’ out and to see in what way I could make some progress with the build of my miniature farm (of my grandparents).


Een paar jaar geleden heb ik na veel zoeken twee boeken gevonden en kunnen kopen, die gaan over de bouw van een bepaald soort boerderij in de vorige eeuw (20e eeuw). Omdat de boerderij van mijn grootouders in deze streek staat en om het zo echt mogelijk na te bouwen, is dit boekje van onschatbare waarde voor mij. Ik ben het boek nu nog steeds aan het bestuderen.
Het andere boek gaat over de erfbeplanting bij dit soort boerderijen hier in deze streek, dus ook de streek waarin de boerderij van mijn grootouders nog steeds staat. Ik heb het gebruikt voor het maken van de ligusterhaag waarover dit blog bericht gaat.

A few years ago, after a long search,  I found and bought two books, who are about the build of a particular sort of farm in the last century (20th century). Because the farm of my grandparents is in this region and because I want to copy it in miniature as realistic as possible, is this booklet invaluable for me. I’m still studying this book now.
The other book is about the planting, which belongs to these types of farms here in this region, including the region where my grandparents' farm still stands. I’ve used this book for making the privet hedges what the subject of this blog post is.


Aangezien ik al jaren rondloop met het plan om de boerderij van mijn grootouders in schaal 1:12 in miniatuur na te bouwen, heb ik sindsdien ook foto’s van de echte boerderij in de jaren ’50 verzameld. Maar de enige foto van de achterkant, de keukenzijde, die op het noorden ligt, is deze die hierboven staat. Trouwens het poesje dat op deze foto staat, probeert uit een melkemmer wat melk te snoepen......de slimmerik ;O).
Ik heb me er altijd over verwonderd waarom er een stuk afgeknipt was….da’s een beetje vreemd, wat stond er op de andere helft…?
Veel is er echter niet op te zien, maar met een vergrootglas kon ik toch nog vaag een paar dingen op zien. Om meer informatie te krijgen, heb ik 25 jaar geleden al aan enkele (toen nog levende) familieleden gevraagd hoe de dingen eruit hebben gezien net na het midden van de jaren 50, mijn vroege kinderjaren.
Uit mijn eigen geheugen weet ik nog dat er een bloemen- en moestuin aan die kant van de boerderij lag, omzoomd met ligusterhagen, ongeveer 70 cm hoog. Met het maken van deze ligusterhagen in mini ben ik inmiddels begonnen.

Because it’s since many years now that I have plans to build in miniature 1:12 scale the farm of my grandparents, I’ve since then also gathered some pictures of the RL farm in the 50s. But the only picture of the rear side, the side of the kitchen, which is situated at the north, it this one here above. By the way, the kitten in this picture is trying to lick some milk from the milk bucket ...... clever kitten ;O).
I’ve always wondered why this picture was cut into half….it’s a bit odd: what was pictured on the other half…?
You can’t see much on it, but with a magnifier glass I vagely could still see some things. For getting more information, I’ve asked 25 years ago some (at that time still living) relatives about how some things have looked like then just after the midst of the 50s, in my early childhood.
From my own memories I know there was a flower and kitchen garden at that side of the farm, lined with privet hedges, of about 70 cm high. Meanwhile I started making these privet hedges in miniature.


Mijn plan is nu om stukken van deze bloemen-/moestuin in mini na te maken, maar om nu meters tuin te moeten na maken, enkel en alleen om ‘n paar foto’s te maken, vond ik te ver gaan. Het is niet alleen ondoenlijk, maar wáár laat ik die grote delen (opslag)? De (uit de kluiten gewassen) miniatuur boerderij bouwen en stofvrij opslaan in een kast is al niet mogelijk, laat staan een compleet boerenerf. Vandaar dat ik jullie nog steeds niets kan laten zien van de boerderij zelf, die nog steeds in stukken is opgeslagen in grote plastic bakken, simpelweg omdat ik er de ruimte niet voor heb L. Vandaar mijn besluit om de tuin in smalle stroken te bouwen, zodat ik die als coulissen kan gebruiken wanneer ik een scène van het boerenleven in de jaren ’50 aan jullie wil laten zien. Het doet me denken aan het landschap, waarin ik nu woon, het is in een kenmerkend zogeheten “coulisselandschap”, toevallig hè, of niet ;O)?

My plan is now for making smaller pieces of these flower and kitchen garden in miniature, because making more centimeters of garden, only for taking a few pictures, crossed the line for me. It’s not only impossible much work, but WHERE do I store those huge parts of garden? Building the huge miniature farm and storing it free of dust is just not possible for me, so a complete farmyard is completely out of my mind. That’s also why I still can’t show you nothing of the mini farm yet, which is now stored in parts in big plastic containers, simply because I don’t have enough space for it L.
Therefore is my decision to build the garden in small strips, so that I can use them as a sort of (theater) wings/scenes, when I want to show you a scene of farm life in the 50s. It brings me to the landscape, wherein I now live, it is a so-called characteristic “scenes/wings/coulisse landscape”, that's coincidentally, huh, or not ;O)?


Dus voor de corona crisis had ik al wat stroken MDF laten zagen en ben ik begonnen met het maken van de mini ligusterhagen. Eerst moet ik even zeggen dat ik jaren geleden al heel veel dingen heb verzameld, dus ik weet niet of het nu nog te koop is.
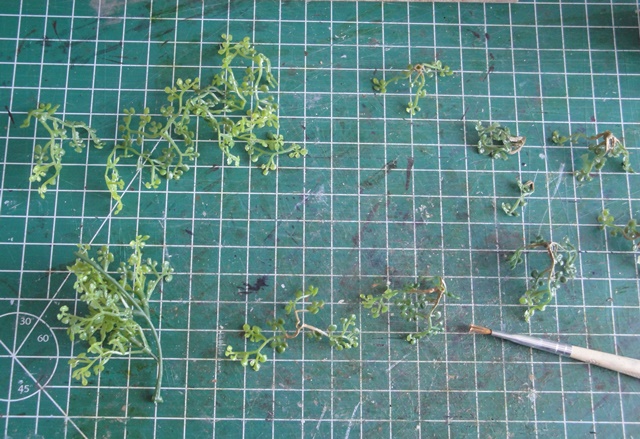
Ik heb in de voorgeboorde gaatjes stukje gedroogde tak gelijmd, die takjes had ik dus ook al voor dit doel gekocht bij het tuincentrum op de decoratieafdeling.

So, before the corona crisis started I’d already bought some strips MDF at the DIY and now I’ve started making the mini privet hedges. First, I must tell you that it has been years ago that I’ve started gathering many things fort his purpose, so I can’t tell you if things are still available/for sale.
In the pre drilled holes I glued in the dried small branches, which I’ve bought at the decoration section of our garden centre.


Voor dat ik verder ging, heb ik eerst het MDF in donkergrijs (matte krijtverf) geschilderd, ook een spaar millimeter aan de bovenkant van de zijkanten. Dit doe ik omdat als het MDF ietsje krom trekt door het beschilderen, je de zijkant kunt zien verschijnen en dat wil ik niet ;).

Before I continued, I fristly painted the MDF strip in a darkgrey (matte chalk paint), and also a few millimeter at the above side of the sides. I’ve done this because if the MDF will be warping a bit after painting, you can maybe see the sides and that’s a no go ;).


Na de donkergrijze onderlaag heb ik de stukken hier en daar bijgeschilderd met reebruine, lukraak gemengd hier en daar, met mosgroene krijtverf.

After the dark gray coat of chalk paint, I painted the pieces here and there with fawn brown, randomly mixed in here and there, with moss green chalk paint.


Toch was het niet naar mijn zin, het was veel te plat, er moest textuur in de ‘grond’ onder de heggen komen. Daarom heb ik de lagen nogmaals geschilderd maar dan door gebruik te maken van een acrylverf gemengd met een soort zand, gekocht in een modeltreinwinkel, op de foto zie je merk etc.

It was still not of my liking yet, it was way too flat, there had to be more texture in the ‘soil’ under the hedges. Therefore I’ve painted these layers again but than by using a sort of acyllic paint mixed up with a sort of sand, which I’ve bought it at a train modelling shop, on the picture you see the brand etc.


Ook na droging van het materiaal nodig vond ik het nodig om er nog één keer dezelfde laag op aan te brengen. Nu ben ik tevreden ;)!
Het volgende wat ik ga doen is het blad aanbrengen, maar dan moet ik eerst even gaan kijken wat voor materiaal ik daarvoor ga gebruiken. Wordt binnenkort vervolgd….

Also after it was dry I thought it was neccessary to add an extra layer of paint. Now I’m satisfied ;)!
The next thing I’ll do is gluing on the leaves, but therefore I firstly have to see of what material I’ll use. Soon to be continued….


(foto is bewerkt vanwege de privicay)
(photo is blurred due to the privacy)

Mijn pioenrozen stonden dit jaar prachtig in bloei, dankzij een speciaal dakje tegen de hete zon van de afgelopen periode. Hoe gek kun je op pioenen zijn ;)?!
Maar de foto daaronder is van mijn grote kleinzoontje, die houdt óók van de pioenrozen bij zijn moeder in de tuin, kijk maar hoe voorzichtig dat kleine manneke ruikt aan de bloemen...zó schattig ;O)!!
Dank voor jullie fijne reacties, allemaal een fijn weekeinde toegewenst!

My peonies were blooming beautifully this year, thanks to a special roof against the hot sun of the past period. How crazy you can be on your beloved peonies ;O)?!
But the photo underneath is of my big grandson, who also loves the peonies in his mother's garden, just look how careful that little boy smells at the flowers...soooo cute ;O)!!
Thank you for your kind comments, have a nice weekend!

Ilona