my e-mailaddress


donderdag 4 maart 2021

Traploper / Stair runner

 Herken je dit misschien….? Op zoek zijn naar iets wat je lang geleden hebt aangeschaft, maar het niet kunnen vinden en verder zoeken totdat je eigenlijk niet meer weet wàt je aan het zoeken was….😀
 
Maybe you do recognise this…? Looking for something you’ve bought a long time ago, but not able to find it and looking further until you don’t know anymore what you actually were looking for…😀

…op die manier heb ik iets gevonden dat ik zocht, maar na nadere inspectie van de verpakking was het geen wonder dat ik het niet kon vinden. Ik zocht de traproedes, maar kijk eens naar bovenstaande foto: wat staat er boven de inhoud vermeld? Inhoud: mini lampje, voor het gebruik van een 12 volt transformator! Laten we eerlijk zijn: in een bewaardoos voor elektra zoek je dit toch niet...😜
 
…this way I’ve found what I was looking for, but after a better look on the packaging, it was no wonder that I couldn’t find it. I was looking for stair rods, but look at the above picture: what is on the packaging? Containing: mini light, for use with a 12 volt transformer!  Let's be honest: in a store box for electric things you don't look for this....😜

Nadat ik de traproedes had gevonden, bleken ze ook nog eens veel te dik te zijn om nu te kunnen gebruiken, dus was al het zoeken voor niets geweest. Maar ik vond wel mooie schroefoogjes in de verpakking, ook niet in verhouding, maar misschien bruikbaar voor iets anders..?
Na nog wat zoeken vond ik de restant stof die ik voor dit doel wilde gebruiken. Ooit gekregen van een vriendin, die naaister was. Het was een synthetische, mooie donkergroene stof, die door kon gaan voor getufte wol, die vroeger gebruikt ook wel werd voor o.a. traplopers.
 
After I had found the stair rods, they also turned out to be way too thick to use now, so all the searching had been in vain. But I did find good screw eyes in the packaging, also out of proportion, but maybe useful for something else ..?
After some more searching I also re-found the leftover fabric that I wanted to use for this purpose. Years ago given by a friend, who was a seamstress. It was a synthetic, beautiful dark green fabric that could pass for tufted wool, which was commonly used for stair runners, among other things.


Ondanks dat deze synthetische stof erg dun was, maar niet goed wilde plooien, heb ik er daarom voor gekozen om de stof van vlieseline te voorzien. Daarna kon ik de stof ook beter recht op de draad te kunnen knippen en had de loper extra stevigheid.
 
Despite the fact that this synthetic fabric was very thin, but did not want to fold well, I therefore chose to provide the fabric with fusible interfacing. After that I was also able to cut the fabric straight to the thread and the runner had extra strength.


En om een traploper netjes én veilig op de trap te vast leggen, gebruikte je de traproedes. De roedes gingen door schroefogen, die direct naast de traploper op de trap waren bevestigd. Nu ik die schroefogen uit de verpakking niet kon gebruiken, heb ik ze zelf gemaakt van gegloeid dun ijzerdraad, ooit gekocht in de hobbywinkel.
Ik knip een stukje draad af met een kniptangetje, draai dat om de punt van een prikpen en voilà je hebt je schroefoog van 1 mm diameter. De roedes zijn geknipt van gegloeid ijzerdraad van 0,8 mm diameter.
 
And to fix a stair runner neatly and safely on the stairs, you used the stair rods. These iron rods went through screw eyes, which were attached to the wooden stairs directly next to the stair runner. Now that I couldn't use those screw eyes from the package, I made them myself from annealed thin iron wire, once bought at the hobby shop.
I cut a small piece of wire with cutting pliers, wrap it around the tip of a lancing device and voilà you have your screw eye of 1 mm in diameter. The rods are cut (with pliers) from annealed iron wire of 0.8 mm diameter.


Na aftekenen van de plaatsen waarin de gaatjes voor de schroefogen moesten worden geboord, kon ik de traploper gaan vastzetten met de roedes. Meteen bij het plaatsen van de eerste roede kwam ik er achter dat de uiteinden te scherp waren. Bijschuren hielp niet, dus heb ik de uiteinden met zwarte matte nagellak aangestipt, waardoor ze nòg beter door de schroefogen gingen en de klus zo geklaard was. Met behulp van een Legosteentje waren ze zo droog.
 
After marking the places where the holes had to be drilled for fixing the screw eyes, I could fix the stair runner with the rods. Immediately when placing the first rod I found out that the ends were too sharp. Sanding down didn't help, so I dabbed the ends with black matte nail polish, which made them go through the screw eyes even better and the job was done in no time. They dried quickly, by using a Lego brick.

Om de traploper op zijn plaats te houden, nadat ik de volgende roede had geplaatst, heb ik steeds een Lego steentje gebruikt zodat de loper niet verschoof.
 
To keep the stair runner in place, after I had placed the next rod, I used a Lego brick so that the runner did not move of place.


Toch was ik nog niet tevreden, er ontbrak nog iets: de traploper was te nieuw! Dus heb ik er een nagelvijltje bij gepakt en heb ik de loper op de randen van de traptreden wat geschuurd om een ietwat versleten uiterlijk te krijgen.
 
Still I was not satisfied yet, something was missing: the stair runner was too new! So I grabbed a nail file and sanded the runner on the edges of the steps to get a slightly worn look.


Zo, de trap met traploper is klaar, maar de unit om hem in te zetten nog niet, dus op naar het volgende onderdeel.
Blijf gezond, zorg goed voor elkaar.
Dank voor jullie fijne reacties, hartelijk welkom aan mijn nieuwe volgers.
Iedereen een fijne vrijdag en weekeinde toegewenst.

 
See here, the stair case and the stair runner are ready, but the unit to put it in is not yet ready, so on to the next part.
Stay healthy, take good care of each other.
Thank you for your kind comments, and a warm welcome to my new followers.
Have a nice Friday and  I wish you a lovely weekend.

 
Ilona

zaterdag 27 februari 2021

(Trap)treetje voor treetje / (Stair) step for step

Het bouwen van mijn mini boerderij vordert langzaam maar zeker, en vooral omdat ik geen afmetingen heb en alles moet doen vanuit mijn  prille jeugd herinneringen en/of zeer oude (slechte kwaliteit) foto’s van de jaren ’50. Ik wilde verder gaan met het bouwen van de trap naar boven, de eerste verdieping.
Terwijl ik de keldertrap aan het maken was (zie vorig blogbericht), herinnerde ik mij dat ik nog ergens een incomplete trap had liggen, ooit gekocht op een beurs. Hierboven op de foto zie je deze gekochte trap, maar na het meten bleek deze trap veel te kort om te kunnen gebruiken in een boerderij met een plafond hoogte van 3 meter.
 
Building my mini farmhouse is progressing slowly, and mainly because I have no RL dimensions and therefore I everything have to do everything from my early childhood memories and/or of a few very old (poor quality) photos from the 1950s. I wanted to continue with building the staircase to the first floor.
While I was making the basement stairs (see previous blog post), I remembered that I had an incomplete staircase lying around somewhere, once bought at a fair. Above in the picture you see this purchased staircase, but after measuring this staircase seams way too short to be used in a farmhouse with a ceiling height of 3 meters.


Toen herinnerde ik mij dat ik ooit begonnen was aan een trap voor in mijn grachtenhuis (komt waarschijnlijk nooit meer af) en na wat zoeken vond ik die trap ook inderdaad. Deze trap was aan de onderkant zelfs afgewerkt meer zeer dun fineer, alsof hij speciaal gemaakt was voor deze boerderij!
Maar goed dat wij, mini-makers, goede verzamelaars zijn, vooral tijdens een pandemie is dat best handig, én een goed excuus om zelfs nòg meer te verzamelen 😋!!
Nadat ik de trap tijdelijk had vastgeplakt met schildertape, bleek ik anderhalve traptrede te kort te komen, nou, dat was nog best aan te passen, toch?!
 
I then remembered that I had once started on a staircase which would go into my canal house (this will probably never get finished) and after some searching I did indeed find that staircase. The underside of this staircase was even finished with very thin fineer, it looked if he was specially constructed for this farmhouse!
Good thing is that we, mini-makers, are also excellent hoarders, especially during a pandemic it’s quite handy to do, AND a good excuse to gather even more 😋!!
After I had temporarily taped the stairs with painter's tape, it turned out to be one and a half stair steps too short, well, that could still be adjusted, right ?!

Bovendien zat er onderaan de trap een soort plateau, waarop je ging staan als je uit de gang komende naar boven wilde lopen. Inclusief dit plateau kwam ik precies uit op de juiste totale hoogte van de trap.
Vroeger hadden dit soort boerderijen geen vaste trapverbinding met de eerste verdieping, omdat die niet gebruikt werd. Als dat wel het geval was en er werd daar geslapen door oudere kinderen, dan werd er een hoge ladder gebruikt vanuit het stallengedeelte.
Mijn vermoeden is dan ook dat deze vaste trap niet bij de bouw, maar er pas later is ingebouwd, te meer omdat er vanuit de opkamer ook een toegang was naar de kelder, die daar onder lag. Maar daarover meer in een ander blog bericht.
 
Moreover, there was a kind of plateau at the bottom of the stairs, on which you could step before you walked up the stairs. Including this plateau, I got exactly at the correct total height of the stairs.
In the past, these types of farms had no regular staircase connection to the first floor, because this floor was not used, as for sleeping of people. But if they did and mostly the older children slept there, a high ladder was used to go there from the stable space.
My suspicion is therefore that this fixed staircase was not built in during the build of the farmhouse, but was only built in later, all the more so because from the up-stairs room there was also an access door to the cellar, which was situated below. But more about that in another blog post.

Het volgende aandachtspunt was dat de trap naar boven met een klein hoekje net iets voor de kelder doorgang kwam te liggen, dus moest alles precies uitgemeten worden om fouten bij de constructie te voorkomen.
 
The next point of attention was that the stairs to the top would be placed, with a small corner, just in front of the basement passage, so everything had to be measured out precisely to avoid errors in the construction.


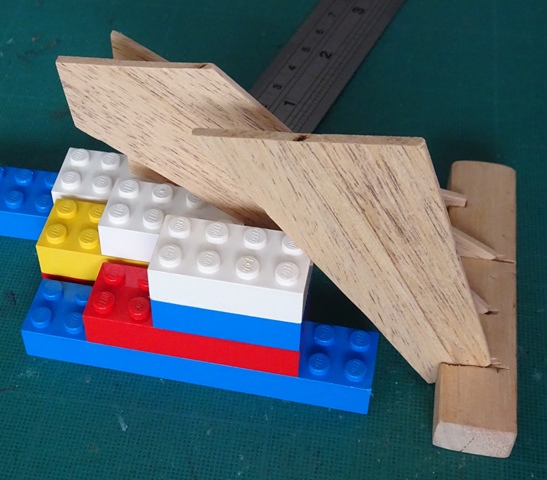
Eerst heb ik het plateau onder aan de trap gemaakt van restant MDF, nu ik alles goed uitgetekend had, ging het prima. Het plateau werd uitgezaagd en met behulp van de Lego blokjes aan elkaar gelijmd.
Toen kwam ik er achter dat ik de scheidingsmuur met de gang dus moest uitzagen om te zien of de trap goed aansloot met de gang. De trap ligt als een soort module tussen de gang en de opkamer in, dus was het belangrijk om uit deze scheidingswand de kelderdeuropening en de trapopening te zagen. Helaas viel na het zagen de scheidingswand per ongeluk op de grond en brak er een stukje vanaf 😱 ik heb het er weer aangelijmd, maar zo jammer....
 
First I build (from leftovers of MDF) the plateau at the bottom of the staircase, now that I had drawn everything properly, it all went fine. The plateau was sawn out and glued together using the Lego blocks.
Then I found out that I had to saw the door openings out of the partition wall with the hallway, to see if the stairs connected well with the hallway. The staircase is a kind of module between the hallway and the up-stairs room, so it was important to saw now the opening for the cellar door and the stairway opening out of this partition wall. Unfortunately this partition wall fell accidentally on the ground after sawing and thereby a piece broke off  
😱. I glued it back again, but what a pity....


Nadat ik mijn hele garage had doorzocht voor een verfroerhoutje, vond ik in de laatste kast (natúúrlijk 😖!) het laatste roerstokje dat onder de verf zat, maar met een uiteinde nog net genoeg hout opleverde voor de extra trede, hoera!! de trap was klaar, nu kon ik verder.
 
After I searched through my entire garage for a paint stirring stick, I found in the last cupboard (of course 😖!) the last stirring stick that was covered in paint, but with one end yielded just enough wood for the extra stair step, hurray!! the stairs was finished, now I could go on.


Ik heb de trap en het plateau geschilderd met acrylverf in een bleekgele kleur die in die tijd algemeen voorkwam. In eerste instantie werd de kleur te fel, waardoor ik er wat warm witte verf bij ingemengd heb, nu zag het er prima uit.
 
I painted the stairs and the plateau with acrylic paint in a pale yellow color, which was often seen at the time. At first the color turned out too bright, so I mixed in some warm white paint, now it looked fine.


En omdat je op een pas geschilderde trap niet naar boven kunt lopen (om te gaan slapen)……heb ik het middelste gedeelte natuurlijk blank gelaten 😋.
 
And because you can't go upstairs (in order to sleep) on a freshly painted staircase ……I left the middle part unpainted, of course 😋.


Hier kun je de trap op zijn plaats zien, nog niets is definitief vastgelijmd. Eerst moet er nog iets anders toegevoegd worden, meer hierover in een volgend blog.
Blijf veilig en gezond, zorg goed voor elkaar!
Dank voor jullie fijne reacties, allenmaal een mooi weekeinde toegewenst.

 
Here you can see the stairs in its place, nothing has been glued permanently yet. First something else needs to be added, more about this in a next blog.
Stay safe and healthy, take care!
Thank you for your kind comments, wishing you all a lovely weekend.

Ilona

zondag 21 februari 2021

Lego stenen / Lego bricks

Wat zou ik zonder deze Lego bouwstenen moeten…?
Ik heb mezelf in de nesten gewerkt, dat is niet zo moeilijk, maar er weer uitkomen, dàt was pas moeilijk 😬!
 
What would I do without these Lego bricks...?
I got myself in trouble, that's not hard to do, but getting out of trouble again, THAT was hard 😬!

Wat heb ik dan gedaan? Nou, ik heb de keldertrap gemaakt, die in de boerderij van mijn grootouders stond. Dat was nogal moeilijk omdat wij, kleine kinderen in die tijd, vroeger nooit in de kelder mochten komen. A: je kon van de trap vallen en B: als klein kind had je er niets te zoeken, zo was de algemene gedachtegang. Maar nu ik met de bouw van de mini boerderij ben begonnen, en ik het plan had opgevat om ook de voorraadkelder te bouwen, kwam ik er achter dat ik dus geen idee had hoe die kelder er eigenlijk uit heeft gezien.
Ik weet nog wèl dat als oma in de kelder was, de deur naar de kelder altijd helemaal wagenwijd openstond om te voorkomen dat iemand die deur dicht deed en daardoor zou komen te vallen. Vanuit de gang kon je een klein stukje kelder zien, dus ook de trap. Die keldertrap had een draai, dat wist ik nog wel, maar verder…??
Omdat wij (in ons eigen huis) ook zo’n ouderwetse voorraadkelder hadden (en geen koelkast), wist ik wel hoe die trap er bij ons uit zag. Onder die trap lagen de aardappelen opgeslagen en eens in de zoveel tijd werd die trap uit die ruimte getrokken om die ruimte schoon te maken voordat er weer nieuwe aardappelen in werden opgeslagen. Daardoor lag die trap los op de keldervloer met een vreemde bocht, want die trap kon niet uit zichzelf recht op staan natuurlijk. Juist omdat die trap er dan zo vreemd bij lag, heb ik hier een goede herinnering aan. Het enige moeilijke voor mij was nu om uit te zoeken hoe zo’n trap heet en hoe ik die moest bouwen…

 
Then what have I done? Well, I made the basement stairs that was in my grandparents' farm. That was rather difficult because we, very young children at that time, were NEVER allowed to enter the basement. A: you could fall down the stairs and B: as a small child you had no business there, that was commonly thought at that time. But now that I started building the mini farm, and I had planned to build the storage cellar as well, I found out that I had no idea what that cellar including the stairs actually looked like.
I do remember that when Grandma was in the basement, the door to the basement was always wide open to prevent someone from closing that door and falling in teh cellar. From the hallway you could see a small piece of the cellar, including the stairs. That cellar stairs had a twist, I remembered that, but otherwise…??
Because we (in our own house) also had such an old-fashioned storage cellar (and no refrigerator), I knew what those stairs looked like at our place. The potatoes were stored in the cellar under that staircase and once in a while that staircase was pulled out into the cellar to clean that space before new potatoes were stored in it. As a result, the staircase was loose on the basement floor with what looked as a strange bend, because that staircase could not stand straight up of its own, of course. Precisely because those stairs looked so strange, I have a good memory (picture in my head) of this. The only difficult thing for me now was figuring out what such a staircase is called and how to build it...

Na veel zoeken op internet kwam ik erachter dat dit soort trap een “streektrap met een onderkwart” werd genoemd. Hoe vertaal ik dat in een beetje fatsoenlijk Engels..? 
En over hoe ik die trap zou kunnen maken, kon ik echter niets vinden.
 
After a lot of searching on the internet, I found out that this type of staircase was called a "loose standing staircase with a (turned to the left) lower quarter". How do I have to translate this into decent English ..? (Well, I can't, but maybe someone of you does recognise it and know what type of stairs this is in English?) 
And I couldn't find anything about how I could make this kind of stairs.

Voor het maken van deze steektrap heb ik lamellen gebruikt van een oude houten jaloezie (2 mm dik), die ik jaren geleden in de kringloopwinkel heb gekocht. Na het afschuren van de laklaag zijn die lamellen goed bruikbaar en ze kunnen zelfs doorgaan als nep “eikenhout” na bewerking, maar meer daarover verderop in dit bericht.
 
To make this staircase, I used slats from an old wooden venetian blind (2 mm thick), which I bought at the thrift store years ago. After sanding off the lacquer layer, these slats are very useful and they can even pass as fake “oak wood” after editing, but more about that later in this post.


Goed, het benodigde hout had ik en nu? Ik heb de tekeningen van de kelder erbij gepakt en ik heb de ruimte (8 x 7,5 cm), waarin de trap kwam te staan, getekend, en dan gezien vanuit meerdere hoeken. Na veel proberen dacht ik het gevonden te hebben, maar tijdens het stap-voor-stap werken moest het bouwwerk steeds weer met millimeters aangepast worden. Het kostte veel tijd maar het is gelukt, leuk toch?!
 
So, I then had the necessary wood and now? I took the drawings of the basement and I drew the space (8 x 7.5 cm), in which the stairs was to be placed, seen from several angles. After a lot of trying I thought I had found it, but during the step-by-step work, the built had to be adjusted by just a few millimeters again and again. It took a lot of time but it worked out quite well, nice right?!


Drie van de vier traptreden moesten uit twee aan elkaar gelijmde latten gemaakt worden, omdat de trap zo’n steile draai maakte en omdat oma niet van de trap af moest vallen, vooral niet op haar leeftijd 😉.
 
Three of the four steps had to be made from two slats glued together, because the stairs made such a steep turn and because mini Grandma shouldn't fall down the stairs, especially not at her age 😉.


Nu moesten de treden aan de trapas gelijmd worden en kwamen de Lego steentjes mooi van pas. Ze hielden de treden omhoog en redelijk op hun plaats. Ik heb contactlijm gebruikt en de groeven in de trapas iets wijder gemaakt dan nodig. Hierdoor had ik wat speling om de treden na het lijmen nog in de ruimte te kunnen passen en daar, tussen de trapbomen, de nacht over te laten drogen. Op die manier kwamen alle treden op de juiste plek, juiste hoek én de juiste hoogte.
En omdat dit soort losstaande trappen ook uit hun plaats (waarin ze stonden) geschoven konden worden, moest deze mini trap dat ook kunnen, vond ik 😊.
 
Now the steps had to be glued to the spindle and the Lego bricks came in handy. They held the steps up and reasonably in place. I used contact adhesive glue and made the grooves in the spindle just a little wider than necessary. This gave me just some slack to be able to fit the steps into the spaces of the wooden stairs sides after gluing and let them dry overnight between these stairs sides. In this way, all steps were placed in the right place, the right angle and the right height.
And because these kinds of freestanding stairs could also be pulled out of their space, in which they were standing, my thought was this mini staircase should also be able to do that too 😊.


Ondanks dat het hout geschuurd was en er wat lakrestjes in de houtnerven waren achtergebleven, heb ik de trap met water en zacht pastelkrijt (gele oker) bewerkt. Hierdoor kreeg de trap meer een oud eiken onbewerkt uiterlijk. En omdat er onder de trap aardappelen lagen opgeslagen, heb ik op de onderkant van de onderste treden ook met donker omber in de hoeken geschilderd. Ook de onderkant van de trapspil is donker gemaakt, veroorzaakt door het schuiven over de vloertegels en misschien ook na het dweilen van de ruimte in het najaar vóórdat deze weer werd gevuld met een nieuwe lading aardappels voor de winter en voorjaar.
 
Despite the fact that the wood had been sanded and some lacquer residue had remained in the wood grain, I edited the stairs with water and soft pastels (yellow ocher). This gave the staircase more of an old oak and unedited appearance. And because potatoes were stored under the stairs, I also painted the corners with dark umber on the bottom of the two bottom steps. The bottom of the stair spindle has also been darkened, caused by sliding over the floor tiles and perhaps also after mopping the room in autumn before it was filled again with a new load of potatoes for the winter and spring.

Na al dat gezwoeg nu eens even zien of mini Oma goed over de trap naar boven kan…..
After all that drudgery, let's see if Mini Grandma can go up the stairs properly…..


…ja, het gaat prima! Het was wat meer moeite maar ik heb nu wel de trap die ik wilde, eentje die er ook nog op de authentieke manier uitgehaald kan worden en dat is in een kleine ruimte best handig!
 
…yes, it works fine! It was a bit more effort but I now have the stairs that I wanted, one which can also be removed in the authentic way and that is quite handy, especially in a small space!


De muren van de kelder zijn inmiddels al voorzien van een hoge zwarte plint, dit ter bescherming van de gewitte muren. Dat werd in deze regio altijd gedaan met kalkverf, of soms met teer.
Zo, verder maar weer.
Blijf veilig en zorg goed voor elkaar 💖!
Dank voor jullie fijne reacties, een hele fijne zondag en nieuwe week toegewenst!

 
The walls of the cellar have already been provided with a black skirting-board, to protect the whitewashed walls. In this region, that was commonly done with chalk paint, or sometimes with tar.
So, we go on again.
Stay safe and take good care of each other 💖!
Thank you for your kind comments, have a lovely Sunday and a new week ahead!

 
Ilona